
Smoked Brisket (Whole Packer, Texas-Style Method)
Last tested on: 5/03/2026
Smoked brisket is a whole packer cooked fat-side up at 250°F, wrapped in butcher paper once the bark sets and the stall hits between 155–170°F, then rested for at least an hour before slicing against the grain. The rub is salt, pepper, and garlic. The technique is what separates a dry, gray slab from a dark, juicy slice worth 14 hours of your time.
I’ve smoked more briskets than I want to admit, and my early ones were genuinely bad. Bark that never formed. Flat muscles that shredded when I tried to slice them. Points I didn’t know what to do with.
The process in this guide is what I landed on after years of cooking these on both offset and pellet setups. As a cookbook author who’s been cooking over fire for 20 years, I can tell you that brisket is the one cut that teaches you something new every single time.

Why This Method Works
- Temperature shapes the whole cook: The right temperature depends on your smoker, your timeline, and how you want to build smoke flavor. 250°F is a reliable default, but it isn’t the only answer. See the temperature strategy section below.
- Butcher paper over foil: Foil traps steam, which softens the bark you spent hours building. Butcher paper is permeable. It contains the moisture and speeds up the cook through the stall, without turning that crust to mush.
- The stall is a feature, not a problem: That 3–5 hour plateau at 155–170°F is the brisket’s connective tissue converting collagen into gelatin. That gelatin is exactly what makes brisket rich and silky when you slice it right. Wrap when the bark looks set, not at a specific temperature.
- Resting is the other half of the cook: The brisket is still tenderizing and redistributing moisture during the rest period. Slice it too early and those juices end up on the board instead of in the meat.
Whole Packer vs Flat Cut: Which Should You Buy?
A whole packer brisket includes both muscles: the flat, which is the long, leaner portion that runs most of the length, and the point, which is the thicker, fattier muscle stacked on top. Packers typically run 12–18 pounds, and this recipe is designed around one.
A flat-only brisket (sometimes sold as “first cut”) is leaner and more widely available at grocery stores. You can smoke a flat, but it’s less forgiving, dries out faster, and you lose the point for burnt ends. If a flat is all you can find, shorten your cook time estimate and wrap it a little earlier than you think you need to.
Where to buy: For a whole packer, Costco and Sam’s Club are the most reliable sources at a fair price. Look for a flat end that’s at least 1.5 inches thick. Anything thinner and it’ll likely dry out before the point is done. Take your time choosing; this cut is expensive, and a bad selection will hurt you more than anything you do on the smoker.
Capital Farms out of Wickenburg, Arizona raises hormone-free, grass-fed and grain-finished Corriente beef that ships nationwide. Their whole trimmed briskets run 7–11 lbs. A good option if you’re cooking for a smaller group or working with a mid-size smoker. Smaller animal, exceptional quality.


Ingredients and Equipment
For the Brisket
- Whole packer brisket (12–16 lbs): Bigger is generally more forgiving. Look for good marbling in the flat and a fat cap that’s relatively even across the surface.
- Kosher salt: The base of every Texas-style rub. It pulls surface moisture, helps the seasoning adhere, and dry-brines the meat overnight.
- 16-mesh black pepper: Coarser than standard ground pepper. The nooks and crannies pick up smoke and crisp into a crustier bark than fine pepper ever will.
- Granulated garlic: My addition to the classic salt-and-pepper base. Adds depth without pulling the rub away from the Texas tradition. This is optional, but recommended.
Our Canyon Crust Beef Seasoning is built on this exact method — coarse, bark-forward, sugar-free. Worth a look if you want to skip the measuring.
Equipment
- Pink butcher paper: For wrapping at the stall and resting. Get a roll with a cutter. You’ll use more than you think.
- Instant-read thermometer: Non-negotiable. This is how you check probe tenderness, not just temperature.
- Food-grade spray bottle: For spritzing during the smoke phase.
- Beef tallow: Pour it over the brisket before wrapping instead of spritzing. Adds moisture and flavor without wetting down the bark the way liquid does.
- 14-inch brisket slicer: A long, thin blade makes even slices possible. Don’t try to carve a brisket with a chef’s knife.
How to Trim a Brisket
Trimming exists for two reasons: to remove fat and meat that will burn before the rest is done, and to create a uniform surface that encourages even smoke flow. A brisket that isn’t trimmed will have thin, dry edges that char long before the thick point is tender. Give yourself 20–30 minutes and a sharp boning knife.
Step 1: Trim the Sides
Slice about 1/4 inch off the outer edges all the way around. This removes the dry brown exterior and reveals the actual muscle structure underneath. Every brisket looks a little different. Take a minute to understand what you’re working with before you start cutting aggressively.
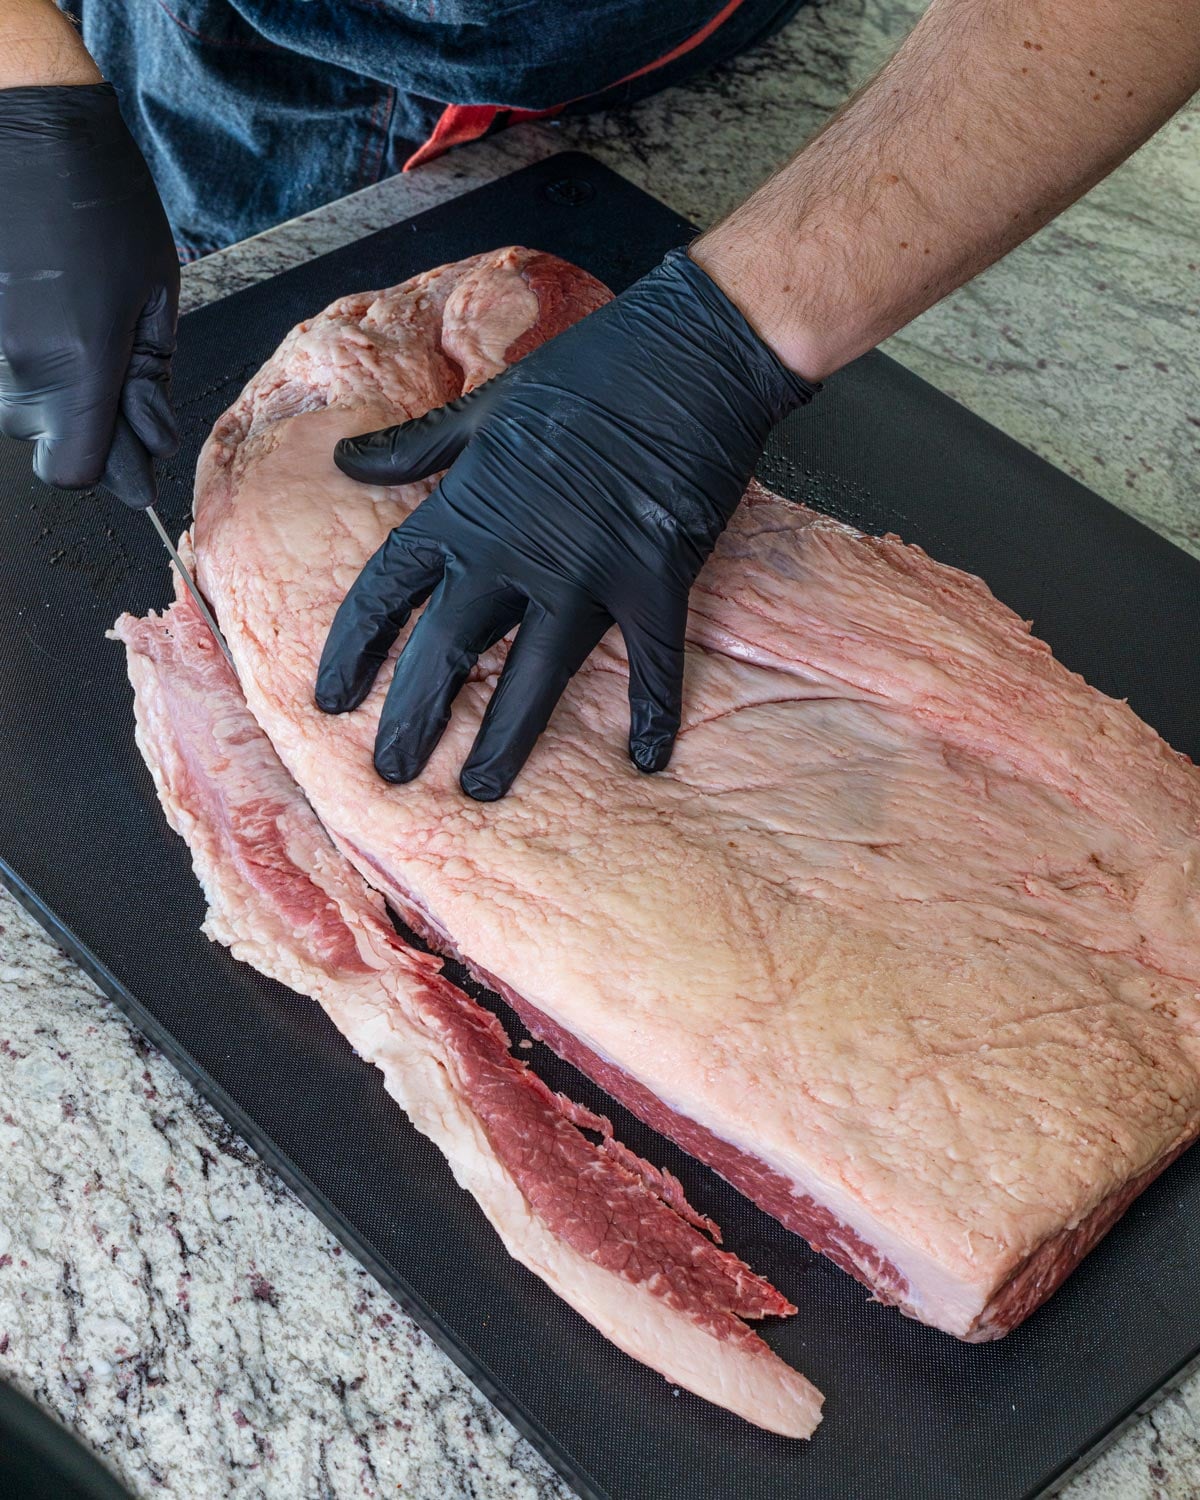
Step 2: Trim the Fat Cap
Flip the brisket fat-side up. The goal is to leave about 1/4 inch of fat across the flat. Enough to protect the meat during the long cook, not so much that it won’t render. Remove the hard deckle fat near the point entirely; it doesn’t render at smoking temperatures and you don’t want to bite into it.
Round off any thin, protruding edges on the flat. Those thin flaps will turn to jerky long before the thick part of the point is done.
Every brisket is different. The amount of fat, the shape of the point, and the thickness of the flat will vary from one packer to the next. The photos here are a general reference, not a blueprint. Use your judgment, go slowly, and know that it takes a few briskets before trimming starts to feel intuitive. That’s normal.

Step 3: Clean Up the Lean Side
Flip the brisket lean-side up. Remove any silver skin, loose fat, and thin flaps of meat on the underside. This side doesn’t have a fat cap, but it usually has enough stray pieces that need cleaning to make a difference in how evenly it cooks.

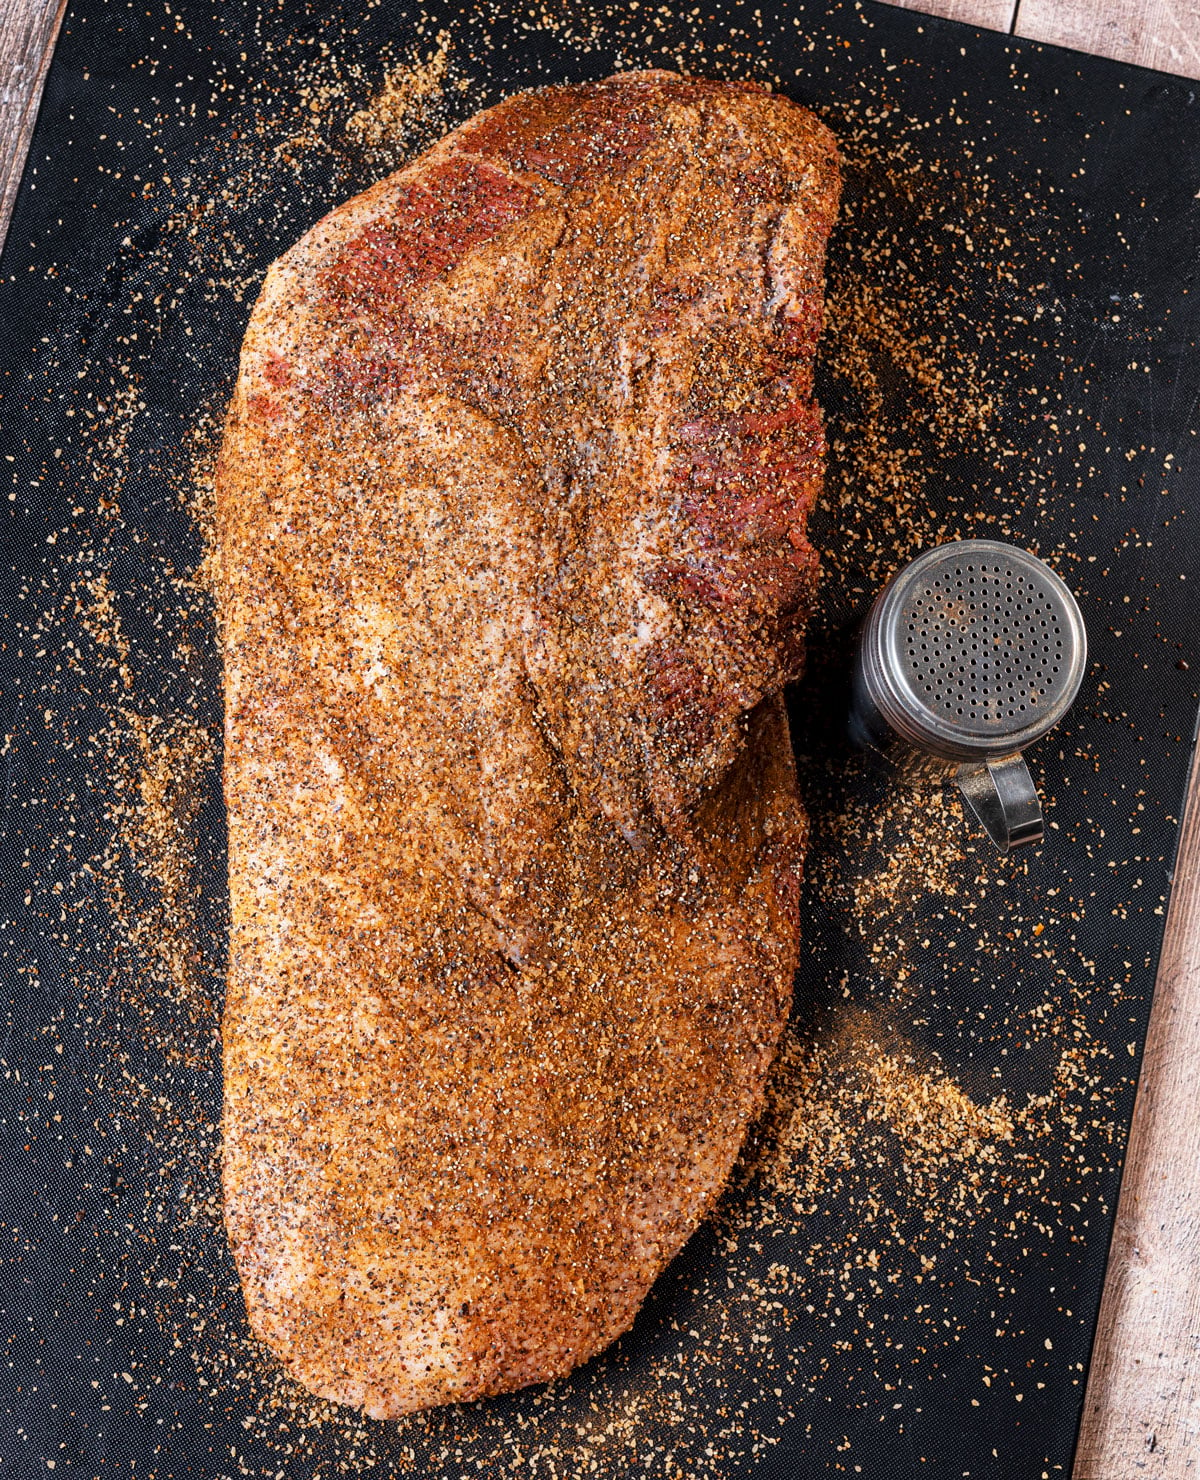
How to Season a Brisket for Smoking
The traditional ratio is equal parts by volume (not weight):
- 1 part kosher salt
- 1 part 16-mesh black pepper
- ½ part granulated garlic (my addition)
If you want to build on that base, keep any additional seasonings under 20% of the total volume. Options worth trying: smoked paprika, celery salt, ancho chile powder, mustard powder. Avoid brown sugar if you’re after a classic bark. It tends to go bitter and sticky at this cook temperature, and the bark you want is dry and crusty, not caramelized.
Do I need a binder? Not if you’re seasoning the night before. Dry-brining draws surface moisture out of the meat within the first hour, and that moisture dissolves and bonds the salt and pepper to the surface. If you’re seasoning same-day and want the rub to stick immediately, a thin layer of yellow mustard works. It adds no real flavor and disappears entirely during the cook.
Trim and season the night before if you can. You save yourself time and stress on cook day, and the overnight dry-brine develops better bark than seasoning and cooking same-day.
How to Smoke a Brisket: Step-by-Step
Step 1: Season and Dry-Brine Overnight
Season the brisket generously on all sides: top, bottom, and edges. Don’t be shy; this is a large cut of meat with a lot of surface area to cover. Place it on a wire rack over a sheet pan and put it in the fridge uncovered for at least 4 hours, ideally overnight. Uncovered is important: the surface dries out slightly, which promotes better bark formation during the cook.
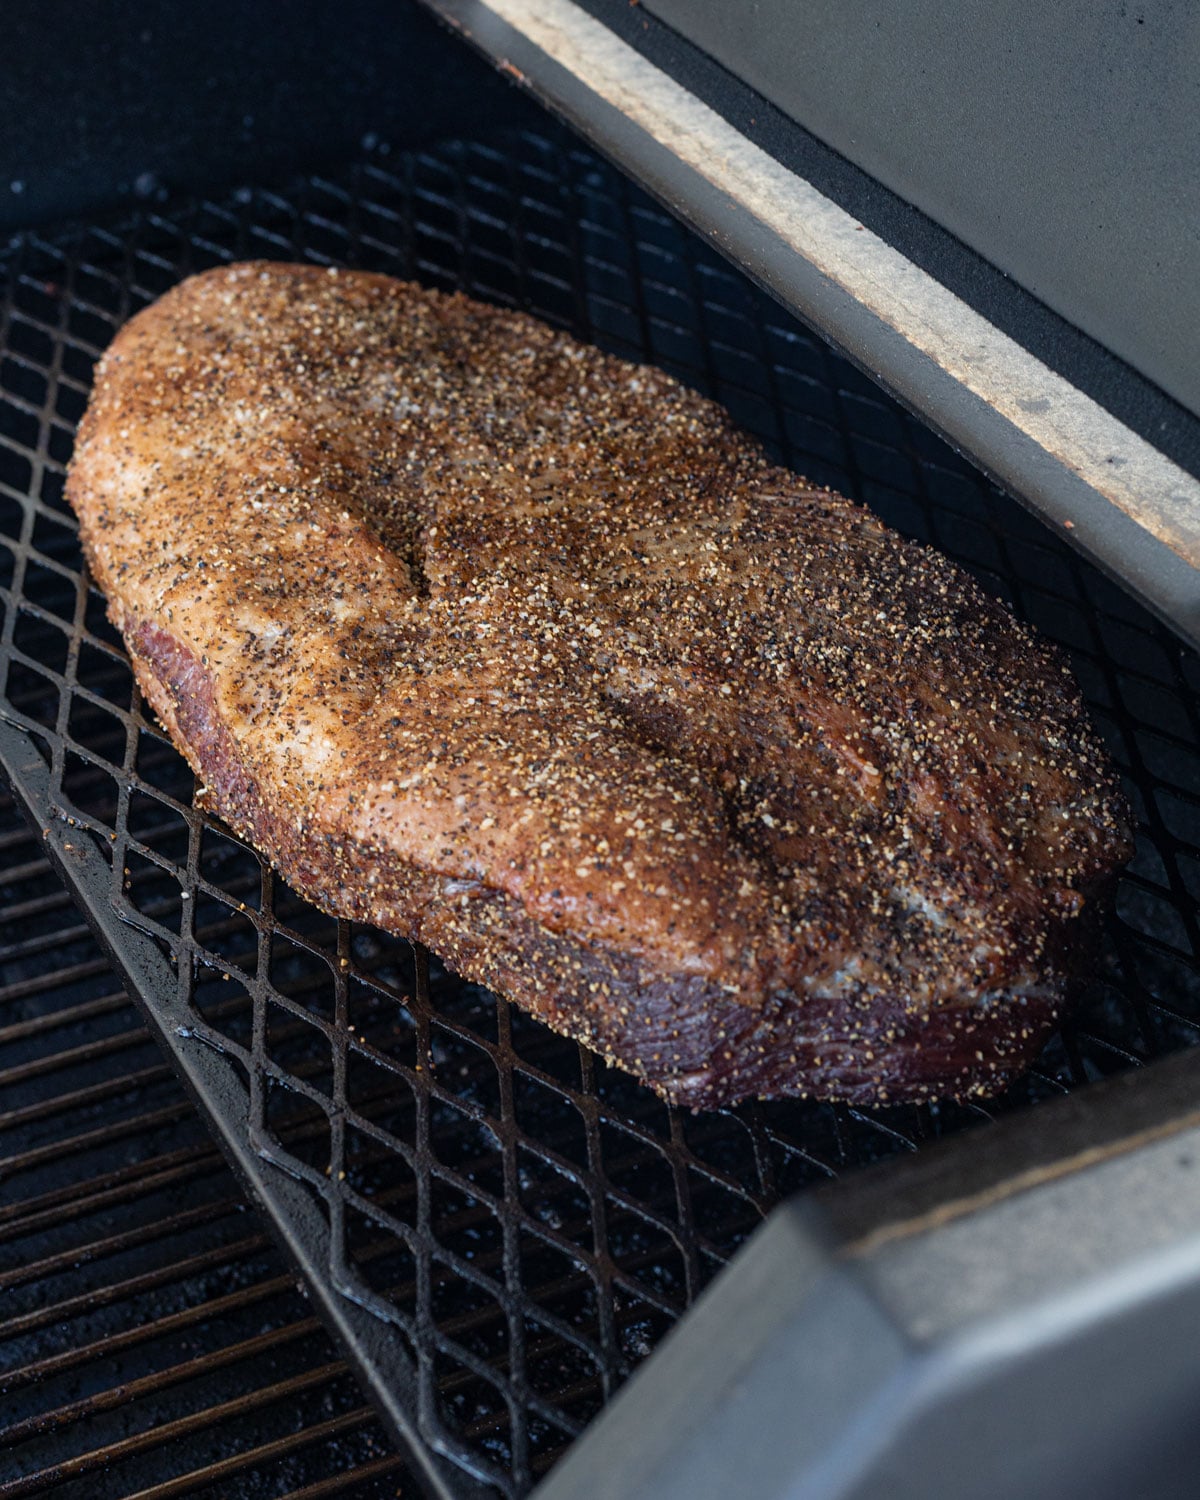
Step 2: Preheat and Place the Brisket
Bring the smoker to 250°F. Take the brisket out of the fridge while the smoker comes to temperature. You don’t need it fully room-temp, but don’t pull it and immediately put it in the smoker either. Place the brisket with the point end closest to the heat source. On an offset, that means toward the firebox. On a pellet grill, that means near the firepot. Fat side up. Leave it alone for the first 3 hours.
A note on fat side up vs down: some pellet grill setups run hotter directly underneath, in which case fat side down makes more sense to shield the flat. If you’ve found a hotspot on your grill, use the fat cap to protect the meat from it.

Step 3: Spritz and Monitor
After 3 hours, start checking the brisket and spritzing the edges every 45–60 minutes to keep them from drying out and to help develop bark. The interior of the brisket builds a steam environment of its own, but the exposed edges need help.
My spritz: water, a splash of coffee, and a dash of Worcestershire sauce. The coffee adds depth and promotes a darker bark color. Apple cider vinegar works too. It’s the classic choice and it’s fine.
Watch for liquid pooling on top of the brisket. If that happens, gently tilt it and let the liquid run off. That pooling prevents bark from forming in that spot, and you’ll end up with a bald patch.
Continue spritzing until the brisket stalls. That’s the moment where the internal temperature stops climbing and sits flat, usually between 155–170°F.
Step 4: Wrap at the Stall
Once the temperature genuinely stalls, not just slowing down but sitting still for 30 minutes or more, and the bark looks dark and set, it’s time to wrap.
Lay out two sheets of pink butcher paper on a flat surface, overlapping them to create a double-wide wrap. Pour about 1/4 cup of melted beef tallow over the brisket before rolling it up. This adds moisture without the bark-softening effect of a liquid spritz at this stage. Roll the brisket into the paper, tuck the sides after the first roll, and make a note of which side is facing up. Return it to the smoker with that side up and bump the temperature to 275°F.
Foil is an option if you want a more tender, fall-apart result, but the bark will soften significantly. Butcher paper is the better call if bark matters to you, which it should.

Step 5: Cook Until Probe Tender
Continue cooking until the brisket reaches around 200–205°F internal, then start checking for probe tenderness. Slide your thermometer probe into the thickest part of the flat. It should go in with almost no resistance. The comparison people use is a jar of peanut butter or warm butter, and that’s accurate. If you feel any resistance, keep cooking and check again in 30 minutes.
Don’t use temperature alone as your signal. Some briskets are probe tender at 198°F; some need to push past 210°F. The collagen conversion and fat rendering don’t follow a timer.

How to Rest Smoked Brisket
Resting is not optional, and resting wrong is one of the most common ways a great brisket becomes a mediocre one.
Do not put the brisket directly into a cooler straight off the smoker. That’s not resting — that’s carryover cooking inside an insulated box, and it pushes the brisket past done. Let it breathe first.
Allow the wrapped brisket to rest at room temperature for at least 45–60 minutes. Don’t let the internal temperature drop below 145°F for any extended period.
After that initial rest, here are your options:
- Loosely tent with foil: Good for shorter holds of 1–2 hours. Slows the cooling without trapping heat.
- Oven, turned off: Place the wrapped brisket on a wire rack over a sheet pan in the oven with the heat off. This slows the cooling significantly and works well if you’re planning to eat within a couple hours.
- Oven at 170–175°F: My preferred method for longer holds. Let the brisket cool to around 170°F internal at room temperature first, then place it in the oven at the lowest possible setting. It will stay in an ideal holding zone for 2–8 hours without overcooking. This is how most BBQ restaurants hold their brisket through service. Pull it out and let it cool to around 150°F before slicing.
- Cooler with towels: After the initial rest, a brisket can go into a cooler lined with towels for an extended hold of 2–4 hours. The towels insulate without trapping heat the way a bare cooler does.

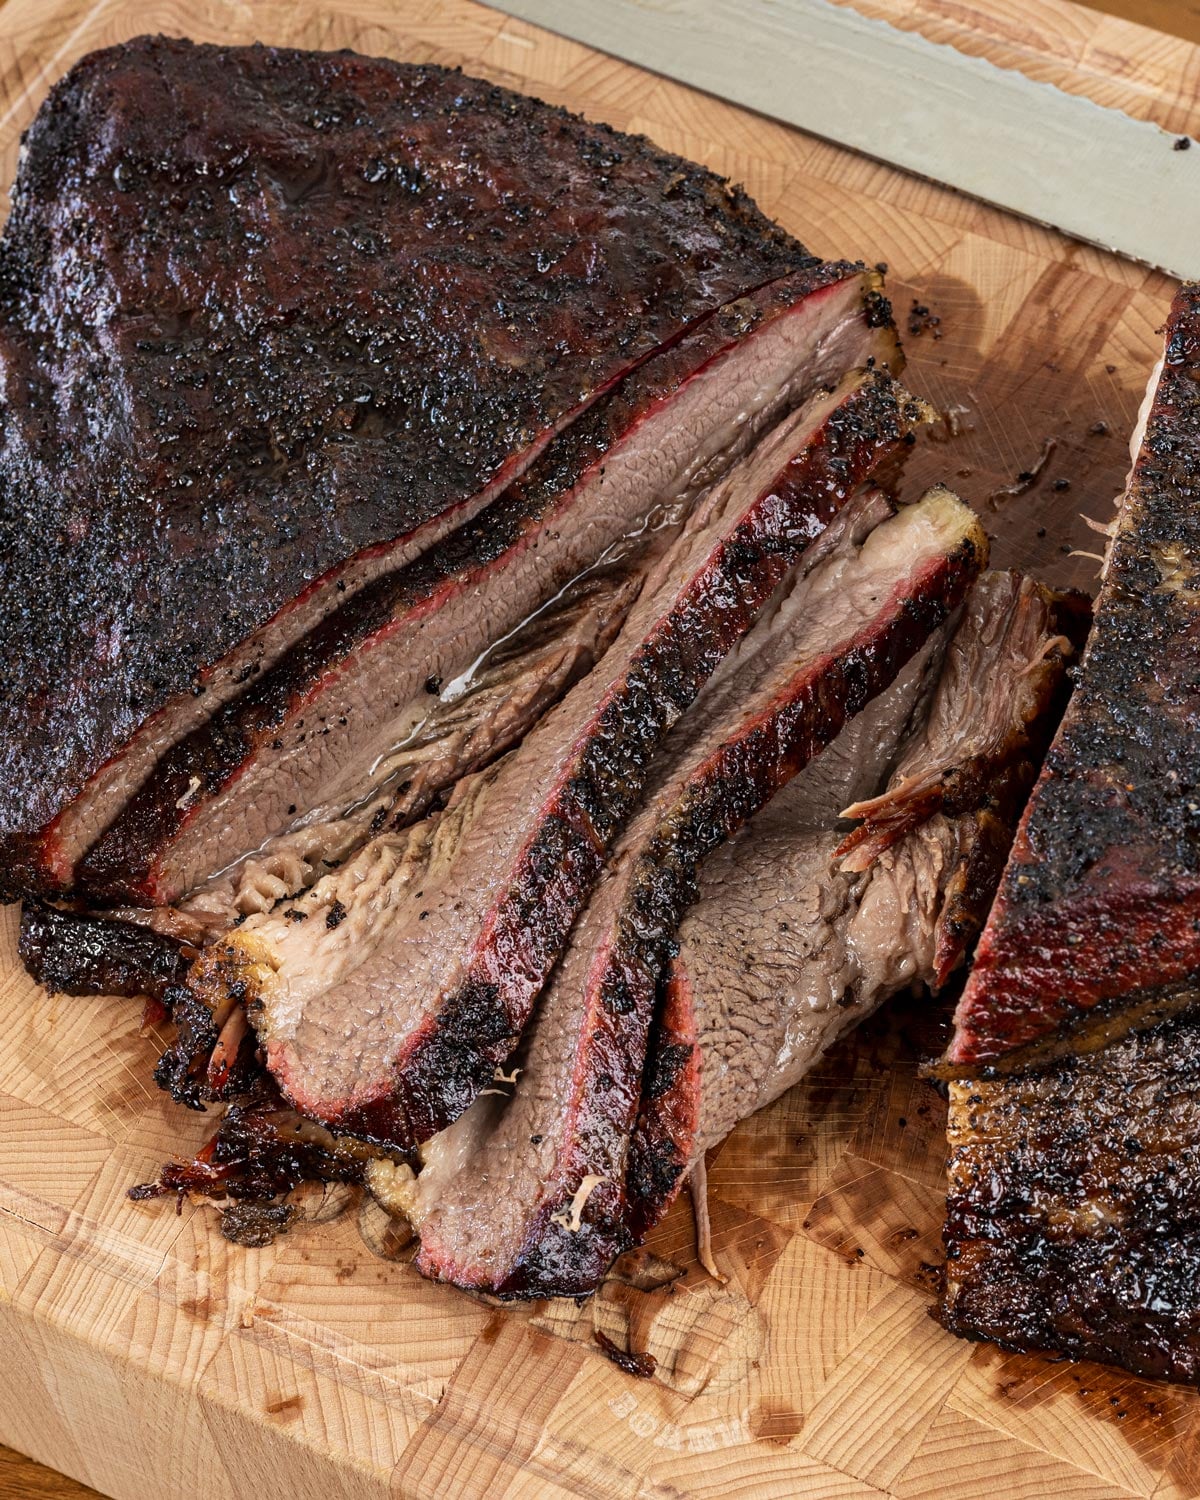
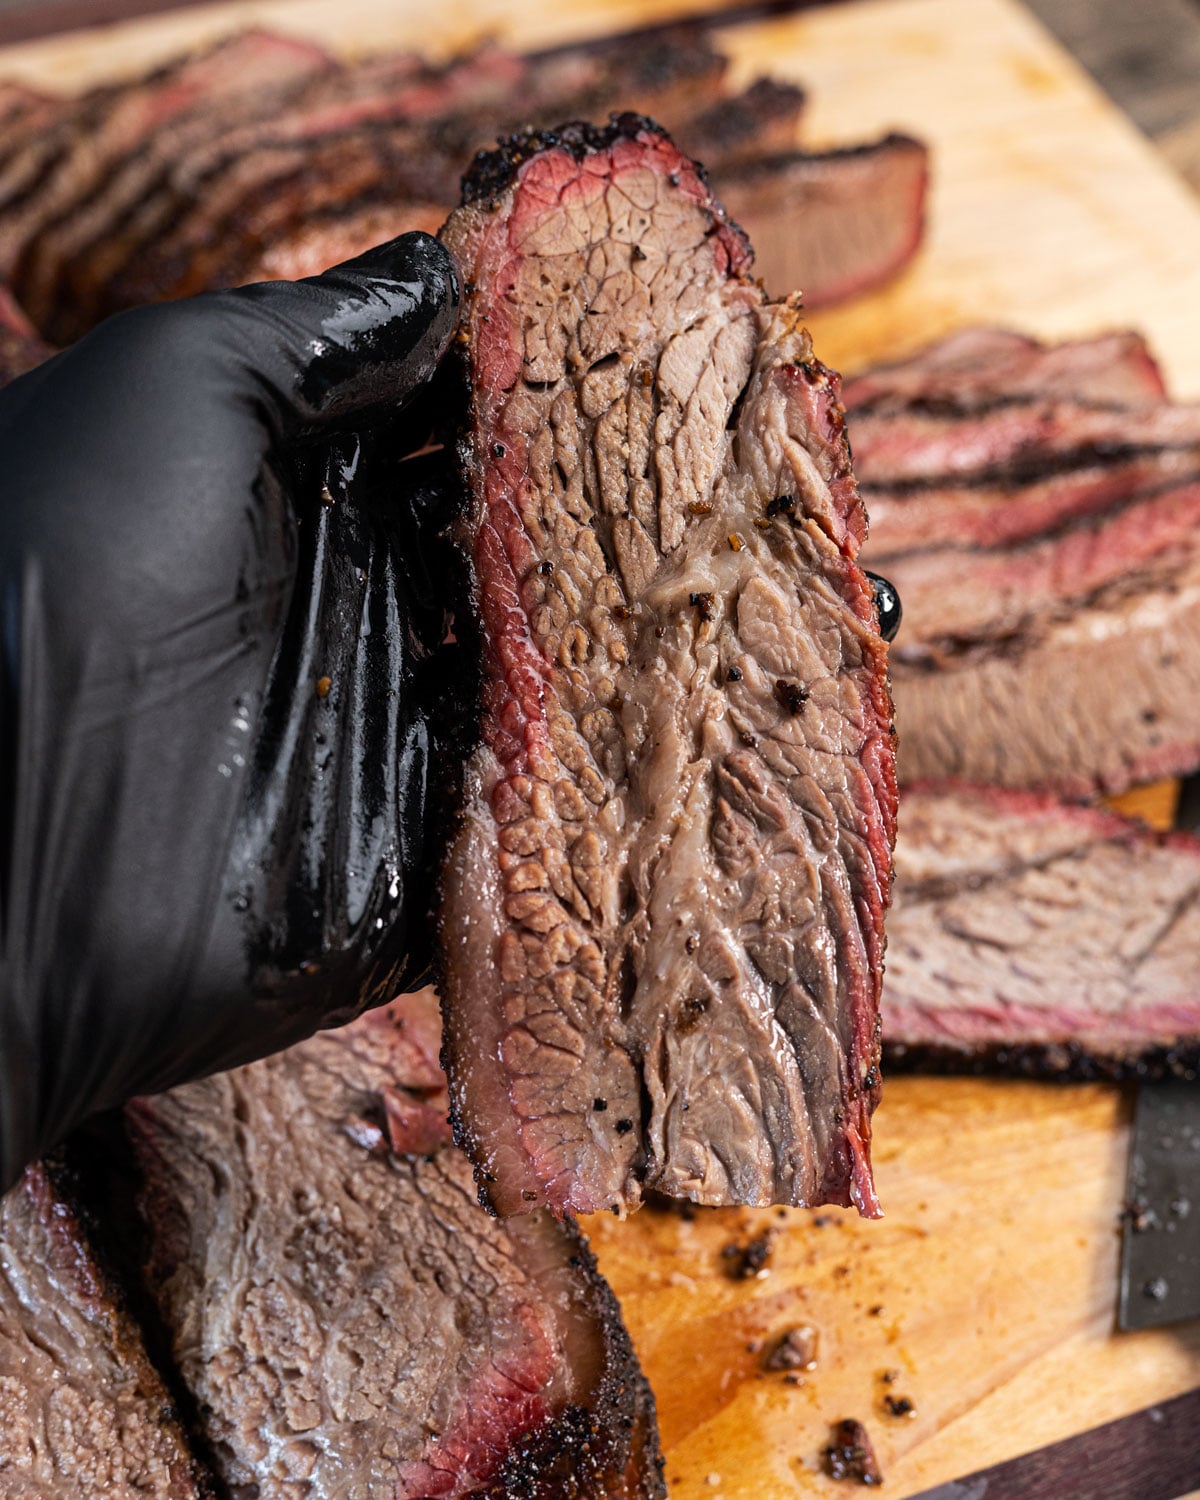
How to Slice Smoked Brisket
Use a long, thin-bladed slicer, at least 12 inches. A chef’s knife is too short and too wide to get clean, even cuts on a brisket.
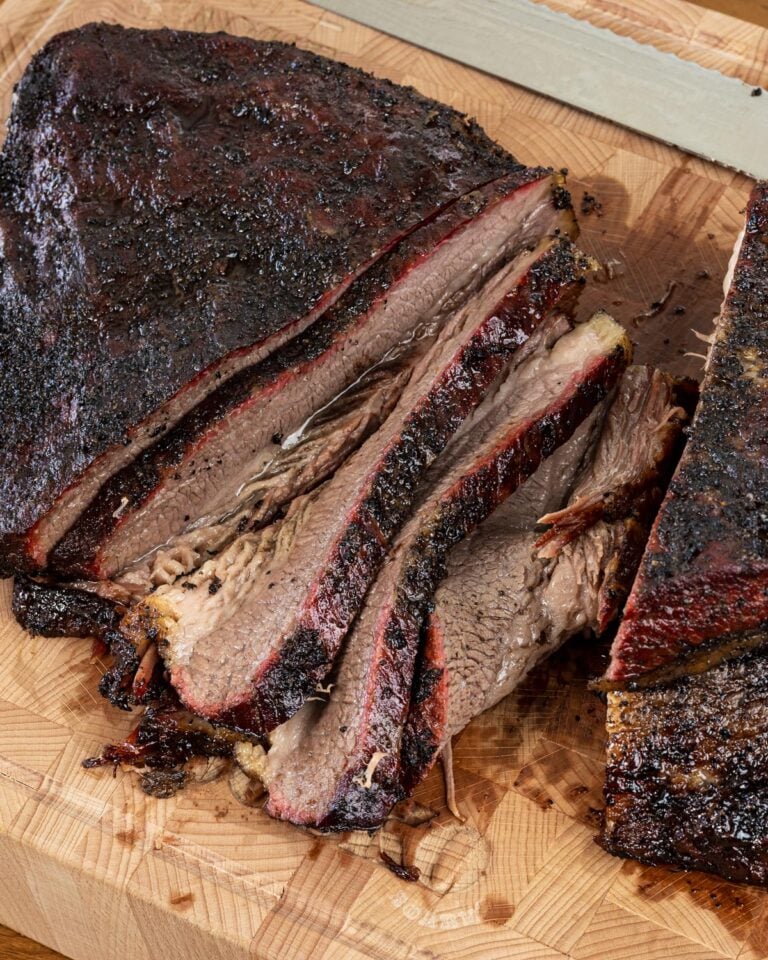
First, find where the point meets the flat and cut there to separate the two muscles. You’ll see a thick layer of fat between them that’s now mostly rendered.
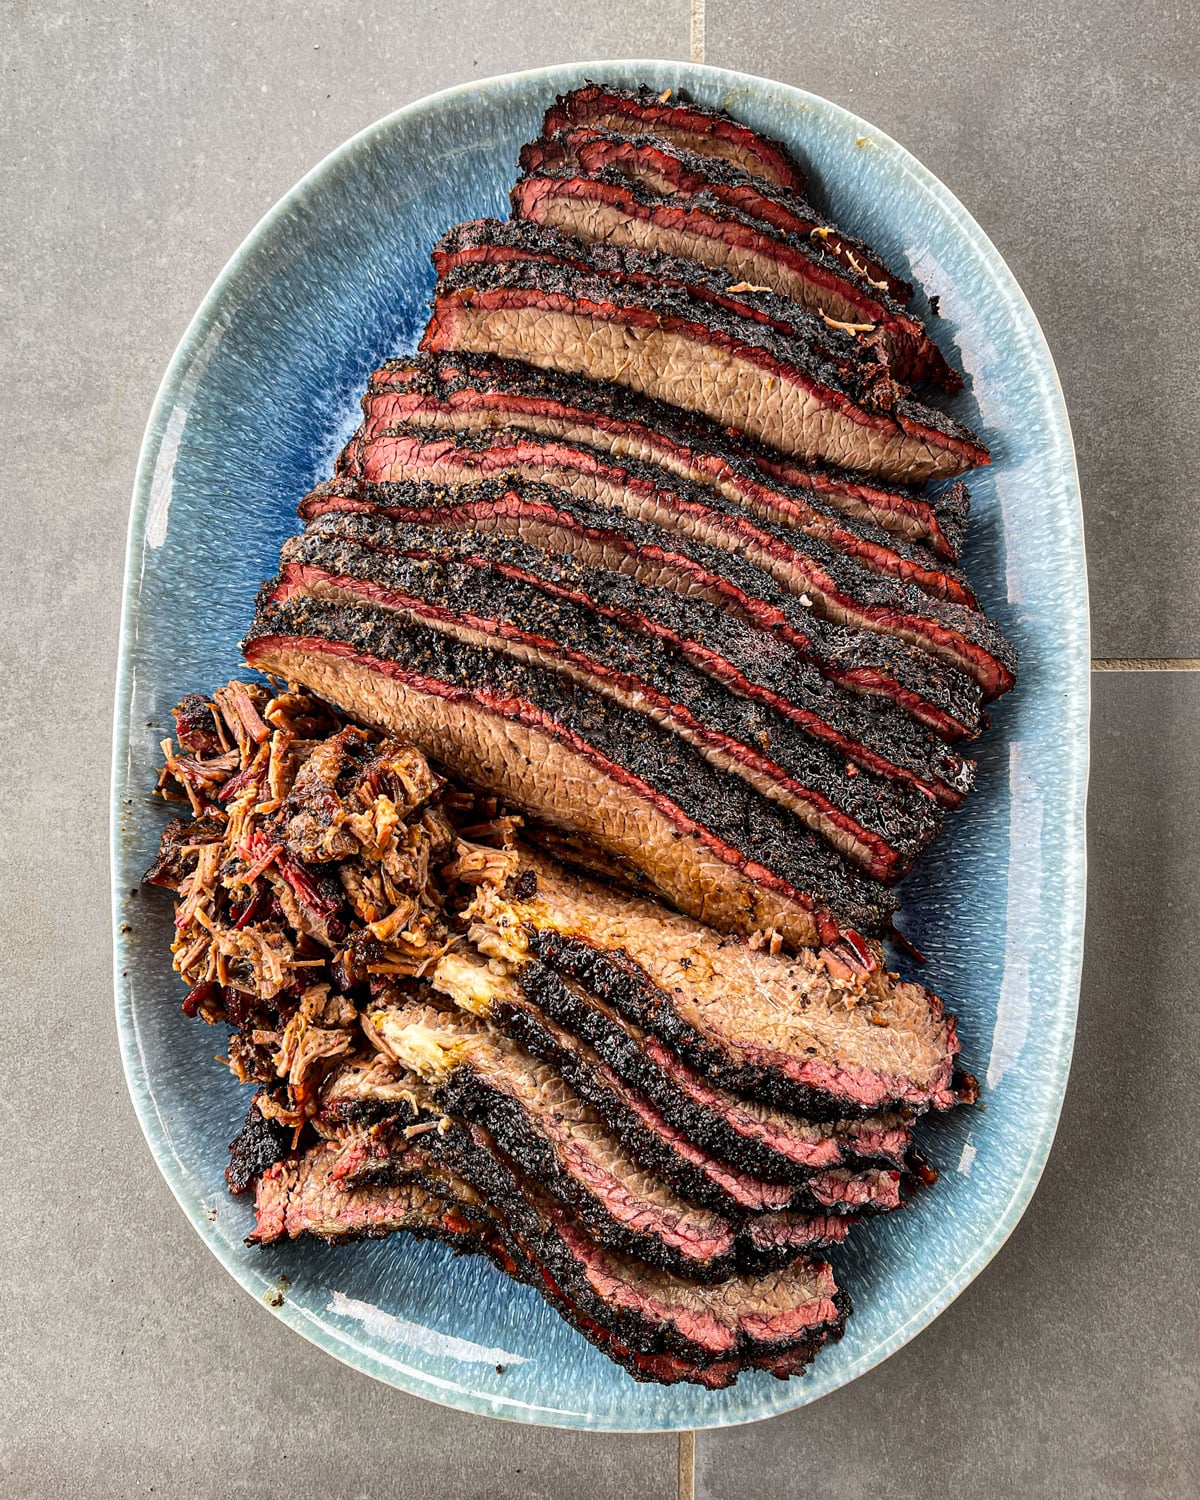
- The flat: Slice against the grain into pencil-thick pieces, about 1/4 inch. Slice the whole flat before moving to the point.
- The point: Cut it in half lengthwise first to expose the grain direction, then slice against the grain. Point slices are richer and fattier than flat slices, and they’re the ones that tend to disappear first.
Reserve any excess point for Brisket Burnt Ends or Smoked Brisket Chili. Slice what you’ll eat now and leave the rest whole. Sliced brisket dries out faster than a whole muscle.

How to Choose Your Smoking Temperature
There isn’t one right answer, and anyone who tells you otherwise hasn’t cooked enough briskets on enough different setups.
The core issue is smoke absorption. Brisket takes on smoke most aggressively in the early hours of the cook, before the surface dries and seals. Once that surface crust starts to form, smoke penetration slows significantly. This is why temperature strategy matters: the goal is to maximize smoke in the window when the meat can still absorb it, without letting the exterior dry out before the interior catches up.
For offset smokers: A gradual temperature climb is a proven approach. Start around 225°F for the first few hours to keep the surface moist and the smoke absorption window open, then let the fire build toward 250–275°F as the cook progresses. Pitmasters like Leroy and Lewis use this method on their offsets. The logic is simple: a slow start prevents the outside from locking up before the inside has developed flavor and begun rendering.
For pellet grills: The strategy is similar but for a different reason. Pellet grills produce less smoke at higher temperatures. Running the first 3–4 hours at 180–225°F on super smoke or low-smoke mode puts as much flavor into the brisket as possible before bumping the temperature to 250°F for the rest of the cook. If you skip this step and run a pellet grill at 250°F from the start, you’re working with a shorter smoke window and a milder result.
The fat rendering window: Once the brisket reaches around 200°F internal, the fat is actively melting and the collagen is converting to gelatin. This is the range that produces a juicy slice. Getting there too quickly, before enough time has passed for smoke penetration and fat rendering to develop, produces a brisket that hits the right temperature but eats dry. Time in the cook matters as much as the final number.
The bottom line: start lower than you think you need to, build heat gradually, and don’t rush the early hours. The bark will come. The smoke flavor has to be earned.
These are estimates. Every brisket is different. A heavily marbled prime packer from Costco cooks differently than a select flat from the grocery store, and your smoker’s airflow and ambient temperature affect the timeline. Use these numbers to plan your cook day, not to determine when it’s done. Probe tenderness is the only reliable signal.
Estimated Cook Times by Weight
|
Brisket Weight |
At 225°F |
At 250°F |
At 275°F |
|---|---|---|---|
|
8–10 lbs |
10–12 hrs |
8–10 hrs |
7–9 hrs |
|
10–12 lbs |
12–14 hrs |
10–12 hrs |
8–10 hrs |
|
12–14 lbs |
14–16 hrs |
12–14 hrs |
10–12 hrs |
|
14–16 lbs |
16–18 hrs |
14–16 hrs |
12–14 hrs |
|
16–18 lbs |
18–20 hrs |
15–18 hrs |
13–16 hrs |
Pull temperature: 200–205°F internal, confirmed by probe tenderness. Rest time: Add at least 1 hour to your total timeline, ideally 2–4.
A note on the temperature columns: the ranges above assume you’re running a consistent temperature throughout the cook. If you’re using a gradual temperature climb (see the section above), your total time will land closer to the 250°F column even if you start at 225°F. The critical signal is always probe tenderness, not the clock. A whole packer that’s probe tender at 198°F is done. One that reads 205°F but still has resistance needs more time.
How much does brisket shrink when smoked? A whole packer loses roughly 30–40% of its raw weight by the time it’s sliced. A 15-pound raw brisket yields approximately 9–10 pounds of cooked meat. Plan on roughly 1/3 pound of cooked brisket per person as a main dish alongside sides, or 1/2 pound if it’s the centerpiece with minimal accompaniments.

Pellet Grill vs Offset Smoker: Does It Matter?
The process above works on both. Here’s what actually changes:
Offset smoker: More smoke flavor, better smoke ring, more active management. You’re feeding the fire every 45–60 minutes and monitoring temperature swings. The smoke quality from a well-run offset on real wood is the ceiling for brisket flavor.
Pellet grill: More consistent temperature, more hands-off, less smoke flavor at higher temps. If your pellet grill has a super smoke or low-smoke mode, run it for the first 3–4 hours at 200–225°F before bringing the temp up to 250°F. That low-and-slow start picks up as much smoke as possible before the surface dries out and stops absorbing it.
The one mechanical difference: on a pellet grill, locate your firepot under the deflector shield and position the brisket point directly above it. That’s your hot spot, and the point needs more heat than the flat.
Best Wood for Smoking Brisket
Wood choice affects smoke flavor more than almost any other variable outside of the cook itself. The right choice depends on how assertive you want the smoke presence and what setup you’re running.
- Post oak: The standard for Texas-style brisket and my default recommendation. It produces a clean, medium smoke with an almost earthy quality that enhances beef without competing with it. The bark it builds is darker than fruit wood and more controlled than hickory. If you’re not sure what to use, start here.
- Hickory: Stronger and more pronounced than oak, with a slightly sweet, bacon-adjacent quality that works well on brisket if you like a bold smoke flavor. The risk is over-smoking. Too much hickory over too many hours produces a bitter, acrid result. I use it sparingly, either as the primary wood for the first 3–4 hours or blended with oak at a 1:3 ratio throughout.
- Pecan: A good middle ground between oak and hickory. Slightly nutty, slightly sweet, burns clean. It’s more accessible in some parts of the country than post oak and produces a milder smoke ring than hickory. Good option if oak is hard to source.
- Mesquite: The most aggressive smoke on this list. Burns hot, produces heavy smoke fast, and can turn bitter quickly on a long cook. I don’t recommend mesquite as a primary wood for a 12–18 hour brisket. If you want that flavor, use it only for the first 2 hours, then switch to oak. It’s more at home on shorter, hotter cooks like steaks and fajita meat.
- Fruit woods (cherry, apple): Too mild for brisket at this cook time. They work well on poultry and pork where the cook is shorter and the meat takes on lighter smoke more easily. On a 14-hour brisket, cherry or apple simply don’t produce enough smoke to make a meaningful impact. The smoke ring will be faint.
What about pellets? Competition blend or oak/hickory pellets are the practical choice for pellet grills. Pure hickory pellets run hot and can over-smoke at high temps. Post oak pellets are worth finding if your brand carries them. Avoid pellets with added flavor oils. They don’t perform the same way as real wood.
How to Store, Reheat, and Use Leftover Brisket
Storage: Leftover brisket keeps in the fridge for 4–5 days. Wrap slices tightly in butcher paper or foil to slow oxidation. If you have large pieces of unsliced muscle left, store those whole. They’ll stay moist longer than sliced portions. If possible, use a vacuum sealer, which will greatly increase the lifespan of your leftovers.
Reheating: Lay slices in a covered baking dish with a tablespoon of beef broth or tallow and warm at 275°F for 10–15 minutes. The added fat or liquid creates a small steam environment that rehydrates the surface without overcooking. Don’t microwave brisket unless you’ve made peace with the result.
What to do with the leftovers: The point muscle is the best possible starting material for Brisket Burnt Ends. Leftover flat is ideal for Smoked Brisket Chili. Chop it rough and let it braise into the chili for the last 30 minutes. Either way, plan for leftovers. A full packer feeds a crowd, and day-two brisket on eggs is its own kind of perfect.
Pro Tips from the Pit
- Season the day before, always. The overnight dry-brine is not a nice-to-have. The difference in bark between a same-day season and an overnight rest is significant. The surface dries out in the fridge in a way that the oven or countertop can’t replicate.
- Coarse spices are not optional. Fine-ground pepper produces a dusty surface that doesn’t crisp up the same way. 16-mesh or a coarse crack gives you the nooks and crannies that pick up smoke and form a real crust.
- Edges getting too dark? Wrap just the flat end with a small piece of foil once it’s looking deep and dry. The flat is thinner and will finish before the point. Protecting it keeps the whole brisket from being done unevenly.
- A water pan helps in dry conditions. During winter or in a low-humidity environment, a small pan of water near the heat source adds ambient moisture that keeps the bark from drying out too fast and speeds up the overall cook.
- Don’t skip the tallow. Spritzing the brisket before wrapping adds liquid that softens the bark. Pouring beef tallow instead adds fat that keeps the bark intact while still adding moisture to the wrap environment.
- Serve the sauce on the side. If you’ve built a proper bark, there is no reason to glaze it.
What to Serve With Smoked Brisket
- Smoked Baked Beans: The obvious call. The smoker’s already running, the beans can cook alongside the brisket in the last few hours.
- Creamy Smoked Mac and Cheese: Rich enough to stand up to brisket, and another reason to keep the smoker going.
- Creamy Southwestern Coleslaw: The acidic crunch cuts through the fat in a way that a simple green salad never will.
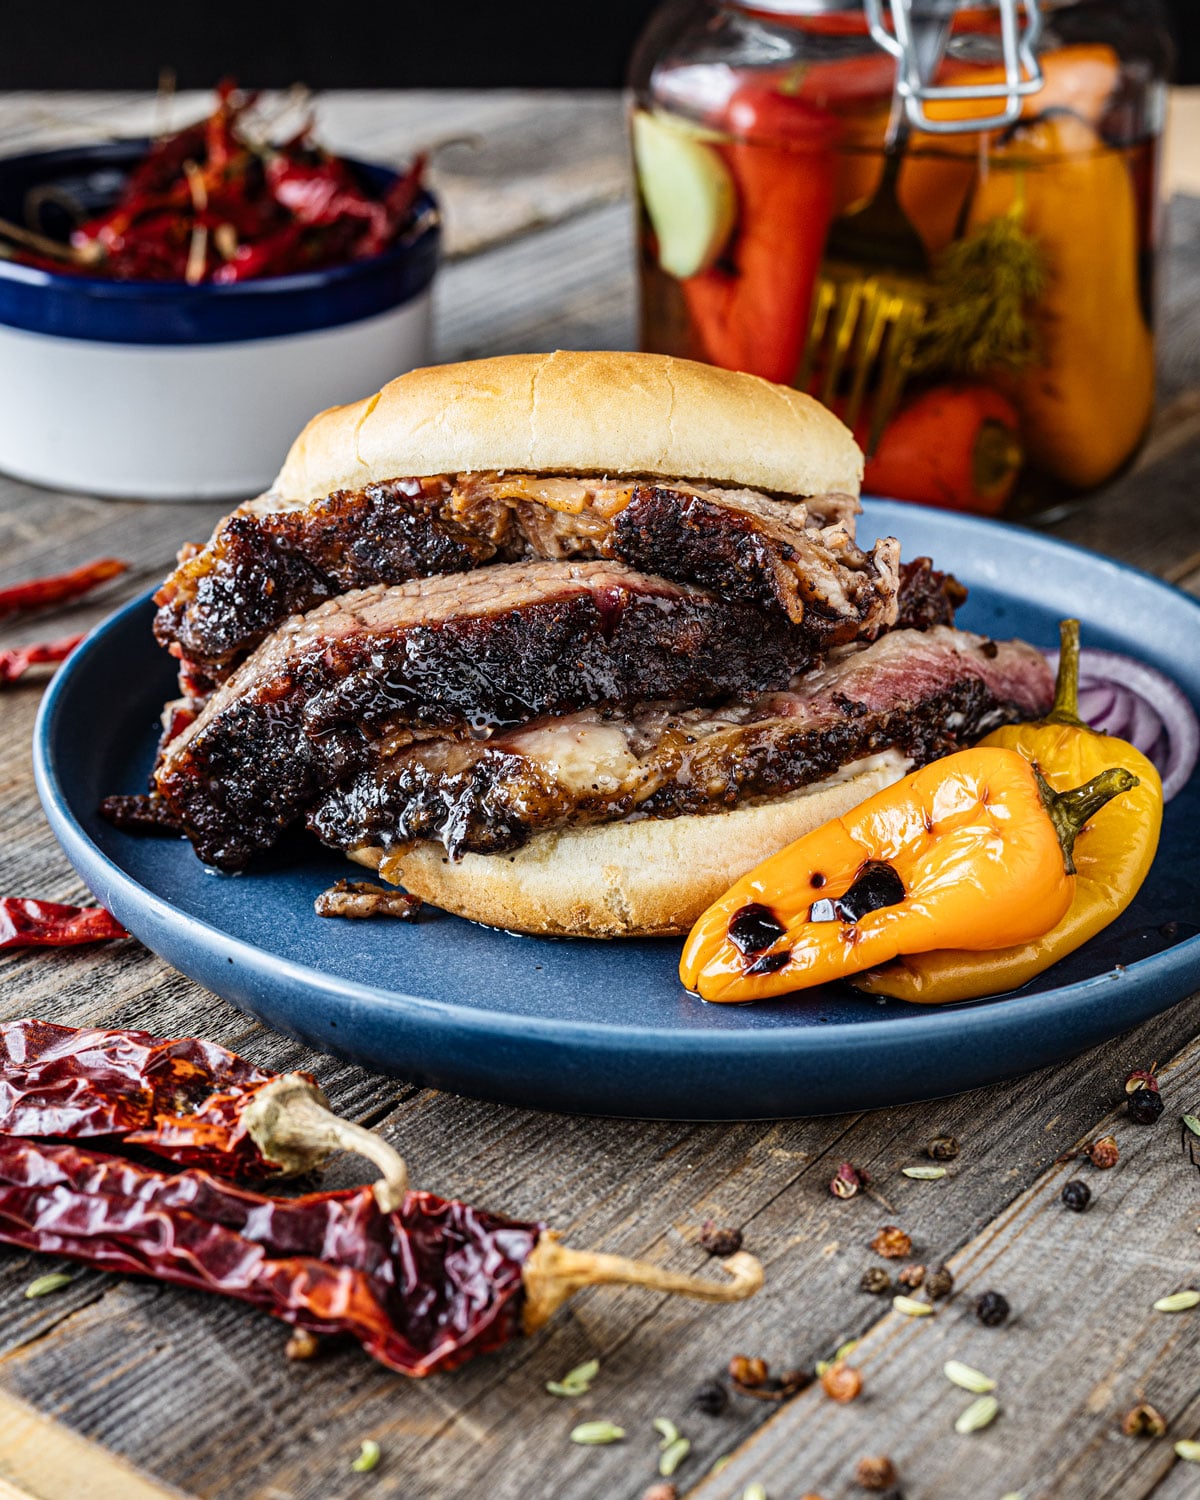
- Quick Pickled Jalapeños or Quick Pickled Red Onions: A little acid and heat on the plate makes the brisket taste better. Make these the day before.
- Homemade Buttermilk Biscuits: For the inevitable second round of brisket sandwiches the next morning.
Frequently Asked Questions
Plan for 1 to 1.25 hours per pound as a starting estimate, but treat it as a rough guide. The cook is done when the probe slides in with no resistance. See the time and temperature chart above for a full breakdown by weight.
The target range is 200–205°F internal, but temperature alone is not the signal. Probe tenderness is. It should glide in with almost no resistance — similar to pushing into soft peanut butter. Trust the probe, not the number.
On most setups, fat side up. The fat cap renders slowly and bastes the flat as it drips, and having it on top insulates the meat from direct heat above if your smoker runs hot overhead. The exception is pellet grills where the heat source is directly underneath the deflector. In that case, fat side down protects the flat from the bottom heat. Understand your smoker’s hot spots before you decide.
Wrap it. The stall happens when surface evaporation holds the temperature flat between 155–170°F, often for 3–5 hours. Wrapping in butcher paper stops the evaporation and lets the internal temperature climb again. Wait until the bark looks dark and set before you wrap.
Yes. Once the brisket is wrapped in butcher paper, it isn’t taking on any more smoke flavor. It’s just cooking low and slow. If the weather turns, the smoker runs out of pellets, or you need to sleep, transfer the wrapped brisket to a wire rack on a sheet pan and finish it in the oven at 275°F. The same doneness cues apply: probe tender at 200–205°F internal. Nobody will know.
Yes, and the most common way it happens is improper resting. Specifically, putting a finished brisket directly into a cooler while it’s still at smoking temperature keeps the carryover cooking going inside an insulated space. Signs of an overcooked brisket: a large pool of liquid in the butcher paper when you unwrap it (juice that was squeezed out of the meat), and a flat that shreds when you try to slice it instead of holding together. The fix is the initial 45–60 minute room-temperature rest before any cooler or oven hold.
No. The smoke ring is purely visual. It forms when nitrogen dioxide from wood smoke reacts with myoglobin in the meat, creating that pink band just below the surface. That reaction has nothing to do with flavor. A deep smoke ring tells you the brisket had good smoke exposure and was cooked correctly. It doesn’t tell you anything about how it tastes. The flavor comes from the smoke compounds absorbed into the meat and the bark built on the surface. Chase the bark, not the ring.
Lay the slices in a single layer in a covered baking dish with a tablespoon of beef broth or beef tallow. Heat at 275°F for 10–15 minutes until warmed through. The cover and the added liquid create a small steam environment that rehydrates the surface without drying it out further. Avoid the microwave. It heats unevenly and evaporates surface moisture too fast.
Try It and Tag Us
If you cook this brisket, leave a star rating and a comment below. It genuinely helps other people find the recipe, and I read every single one. Tag us on Instagram when you do. I want to see that bark.
Smoked Brisket (Whole Packer, Texas-Style)
A whole packer brisket smoked at 250°F, wrapped in butcher paper at the stall, and rested properly before slicing. Salt, pepper, garlic, patience. Done right.
- Total Time: 14-20 hours
- Yield: About 14–18 1x
Ingredients
- 1 whole packer brisket (12–16 lbs)
- 1/2 cup Canyon Crust Beef Seasoning, OR:
- Equal parts kosher salt and 16-mesh black pepper
- Half part granulated garlic
- Beef tallow (1/4 cup, melted, for wrapping)
- Spritz (optional): water, coffee, and Worcestershire sauce (or apple cider vinegar)
Instructions
- Trim the brisket the night before. Remove hard fat, round off thin edges, leave 1/4 inch fat cap. Season generously on all sides. Place on a wire rack in the fridge, uncovered.
- Preheat smoker to 250°F. Place brisket fat-side up with the point toward the heat source. Cook undisturbed for 3 hours.
- Begin spritzing the edges every 45–60 minutes. Continue until the brisket stalls between 155–170°F and the bark looks dark and set.
- Wrap the brisket in two overlapping sheets of pink butcher paper. Pour 1/4 cup melted beef tallow over the brisket before rolling. Tuck the sides, note which side is up, and return to smoker at 275°F.
- Cook until the probe slides into the thickest part of the flat with almost no resistance, around 200–205°F internal. Check tenderness, not just temperature.
- Rest at room temperature for 45–60 minutes before slicing. For a longer hold, place in oven at 170°F for up to 8 hours once the brisket has cooled to 170°F internal.
- Separate the flat from the point. Slice flat against the grain into 1/4-inch slices. Slice point in half lengthwise, then against the grain.
Notes
- Rub ratio: Measure salt and pepper by volume, not weight. Keep any additional seasonings under 20% of total volume.
- Binder: Not needed if seasoning overnight. If seasoning same-day, a thin layer of yellow mustard helps the rub adhere.
- Pellet grill: Run super smoke or low-smoke mode for the first 3–4 hours at 200–225°F before bringing the temp up to 250°F. Position the point over the firepot.
- Storage: Refrigerate up to 5 days. Reheat slices in a covered dish at 275°F with a tablespoon of beef broth or tallow for 10–15 minutes.
- Leftover ideas: Use the point for Brisket Burnt Ends or cube the flat for Smoked Brisket Chili.
- Prep Time: 30 minutes
- Cook Time: 12-18 hours
- Category: Beef
- Method: smoking
- Cuisine: American BBQ, BBQ, Texas BBQ
- Diet: Gluten-Free
Nutrition
- Serving Size:
- Calories: 882
- Sugar: 0 g
- Sodium: 747.8 mg
- Fat: 59 g
- Carbohydrates: 0.7 g
- Protein: 81.1 g
- Cholesterol: 281.1 mg
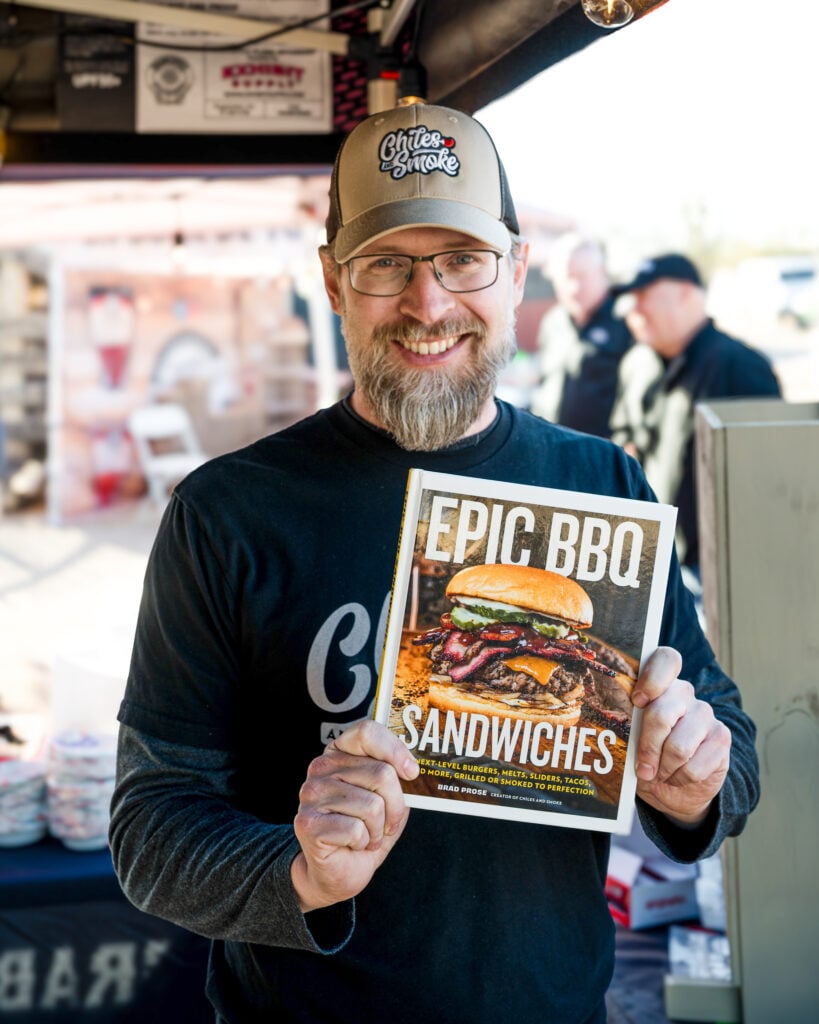
Brad Prose has been crafting recipes over live fire for 20 years. He’s the author of two cookbooks, Chiles and Smoke and Epic BBQ Sandwiches, and the creator of the original smash burger taco, as credited by the Washington Post, TODAY Show, Good Morning America, and Food Network. Brad is the force behind Chiles and Smoke, the home of Sonoran BBQ: bold flavors built around chiles, smoke, and the traditions of the American Southwest. Follow along on Instagram, YouTube, and Facebook.


Awesome work again, Brad!
Thank you! Hope it helps!