
Butterflied Chicken Drumsticks (Quick & Flavorful)
Butterflied chicken drumsticks are an obvious solution to make crispier, more flavorful chicken drumsticks with much less cooking time. Take a few minutes to split open the meat, season, and grill. You’re never going to stress about those high prices of chicken wings again.

Are butterflied chicken drumsticks worth it? Absolutely, if you’re an avid fan of grilled chicken drumsticks. The process has hardly any downsides, between the lower cost, quicker cooking time, and more crispy flavor. Spending a few minutes to butterfly the chicken legs is definitely worth it!
Why This Process Works
- Faster cooking: Cut down the cooking time by HALF using this process. If you’re impatient like me, this is the way.
- Affordable: Chicken drumsticks are typically the cheapest cut of chicken at the store. No one wants them, and they are extremely low cost because of it.
- Consistent cooking: No more pink, rubbery meat next to the bone. Exposing the meat on the drumstick allows it to cook evenly while still staying juicy.

Why should you Butterfly Chicken Drumsticks?
Grilling chicken drumsticks is tricky for many reasons. The thick meat around the bone tends to cook unevenly, many times leaving unappetizing streaks of pink and red inside. Too high of heat and the skin will burn before the chicken is fully cooked.
Using the butterflied method addresses these issues, but it takes a little time to prepare.
The term “butterflied” refers to slicing the meat on the drumstick revealing the bone inside. Opening up the meat this way creates a larger cooking surface, providing a means to cook the chicken evenly, and much quicker.

The process is pretty straightforward, much easier than splitting chickens or using the spatchcock method. You’ll need a very sharp knife, a cutting board, and your chicken drumsticks.
Step 1: Slice Along the Bone of the Drumstick
Flip the chicken drumstick to the side with the meat exposed at the top (see image below).
This is the side to cut, which has less skin. It’s not a game-breaker if you slice the wrong side, but I’ve found the skin crisps up nicer if you do it this way.

Using a sharp knife, make a slice in the meat along the side of the bone. Be careful not to cut all the way through.
Make a second cut along the other side of the bone, separating the meat so that it opens up flat. The bone should be completely exposed.
Make sure to keep the meat attached to the bone, do not slice off the top, or the meat from the back of the bone.

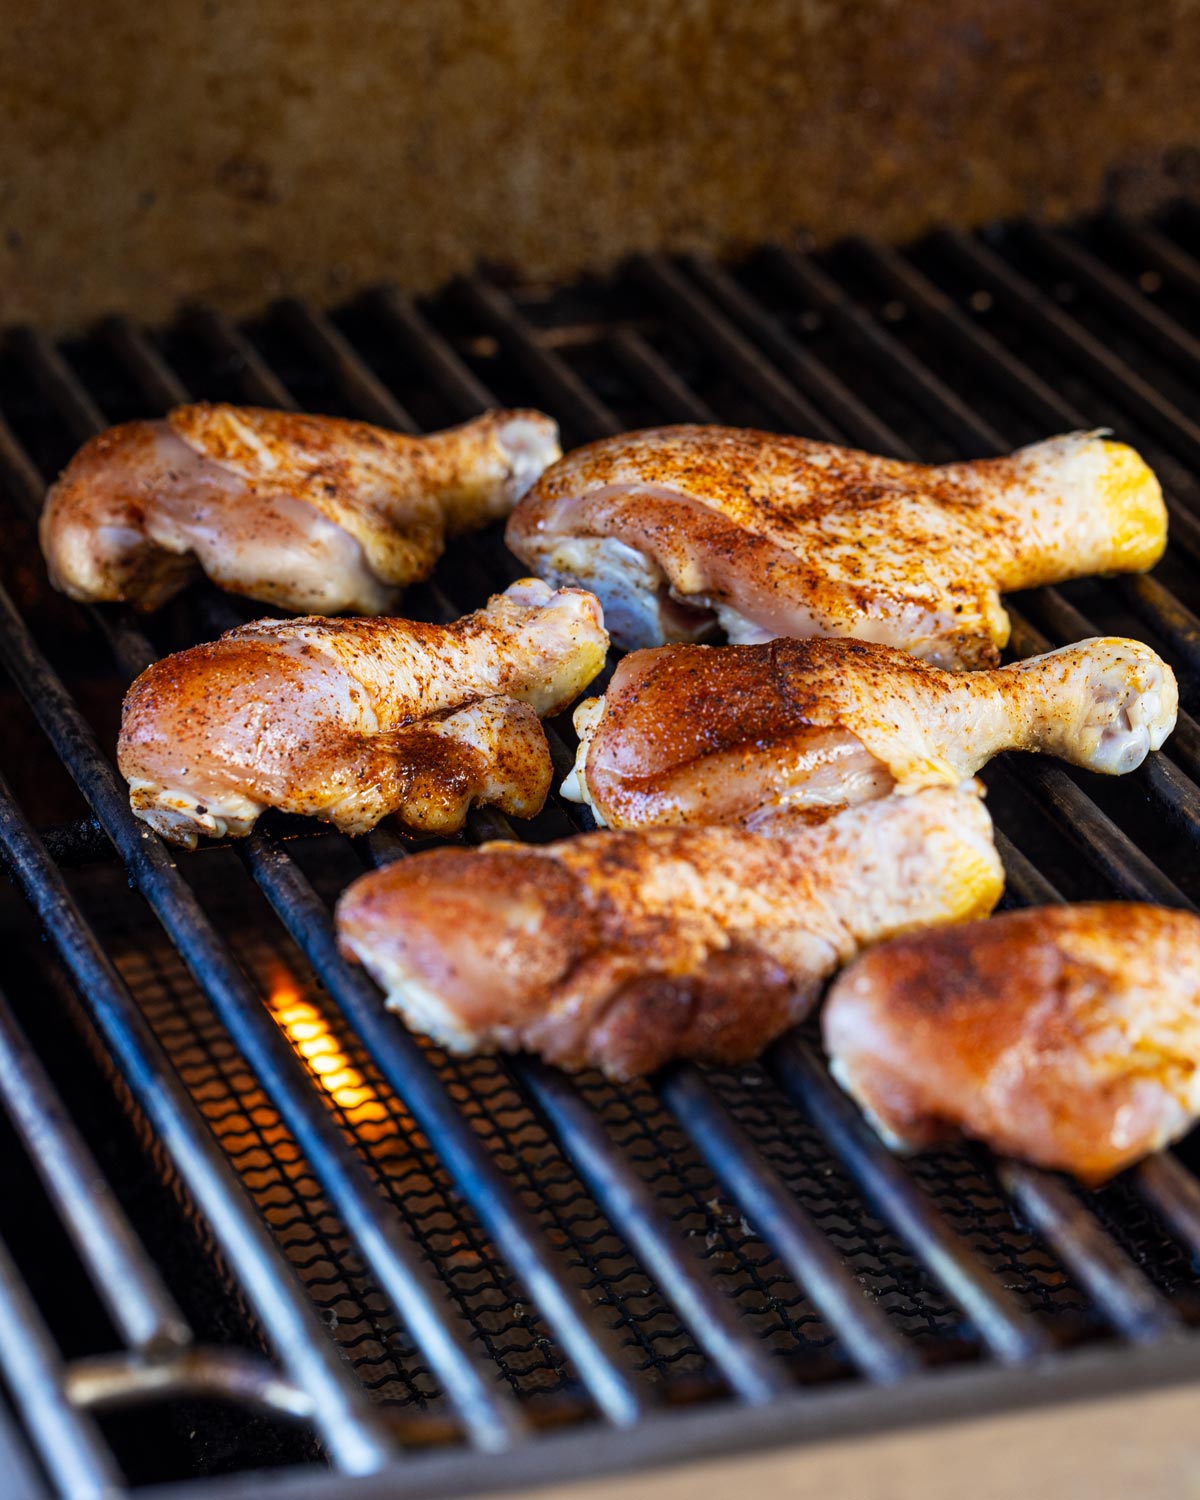
Step 2: Season and Grill
Season generously and then place them uncovered in the fridge on a wire rack for 2 hours, up to overnight. Lightly oil when ready to grill.
You may season them and grill sooner, but the skin will be crispier if you allow them that time to dry-brine.
Preheat grill to medium-high, 400°F for direct cooking. Use a grill with a lid.
Remove the chicken from the fridge at least 20 minutes before adding to the grill, allowing them to come to room temp. Place the drumsticks on the grill grates with the skin-side up. Close the lid and allow them to cook for 5-6 minutes.
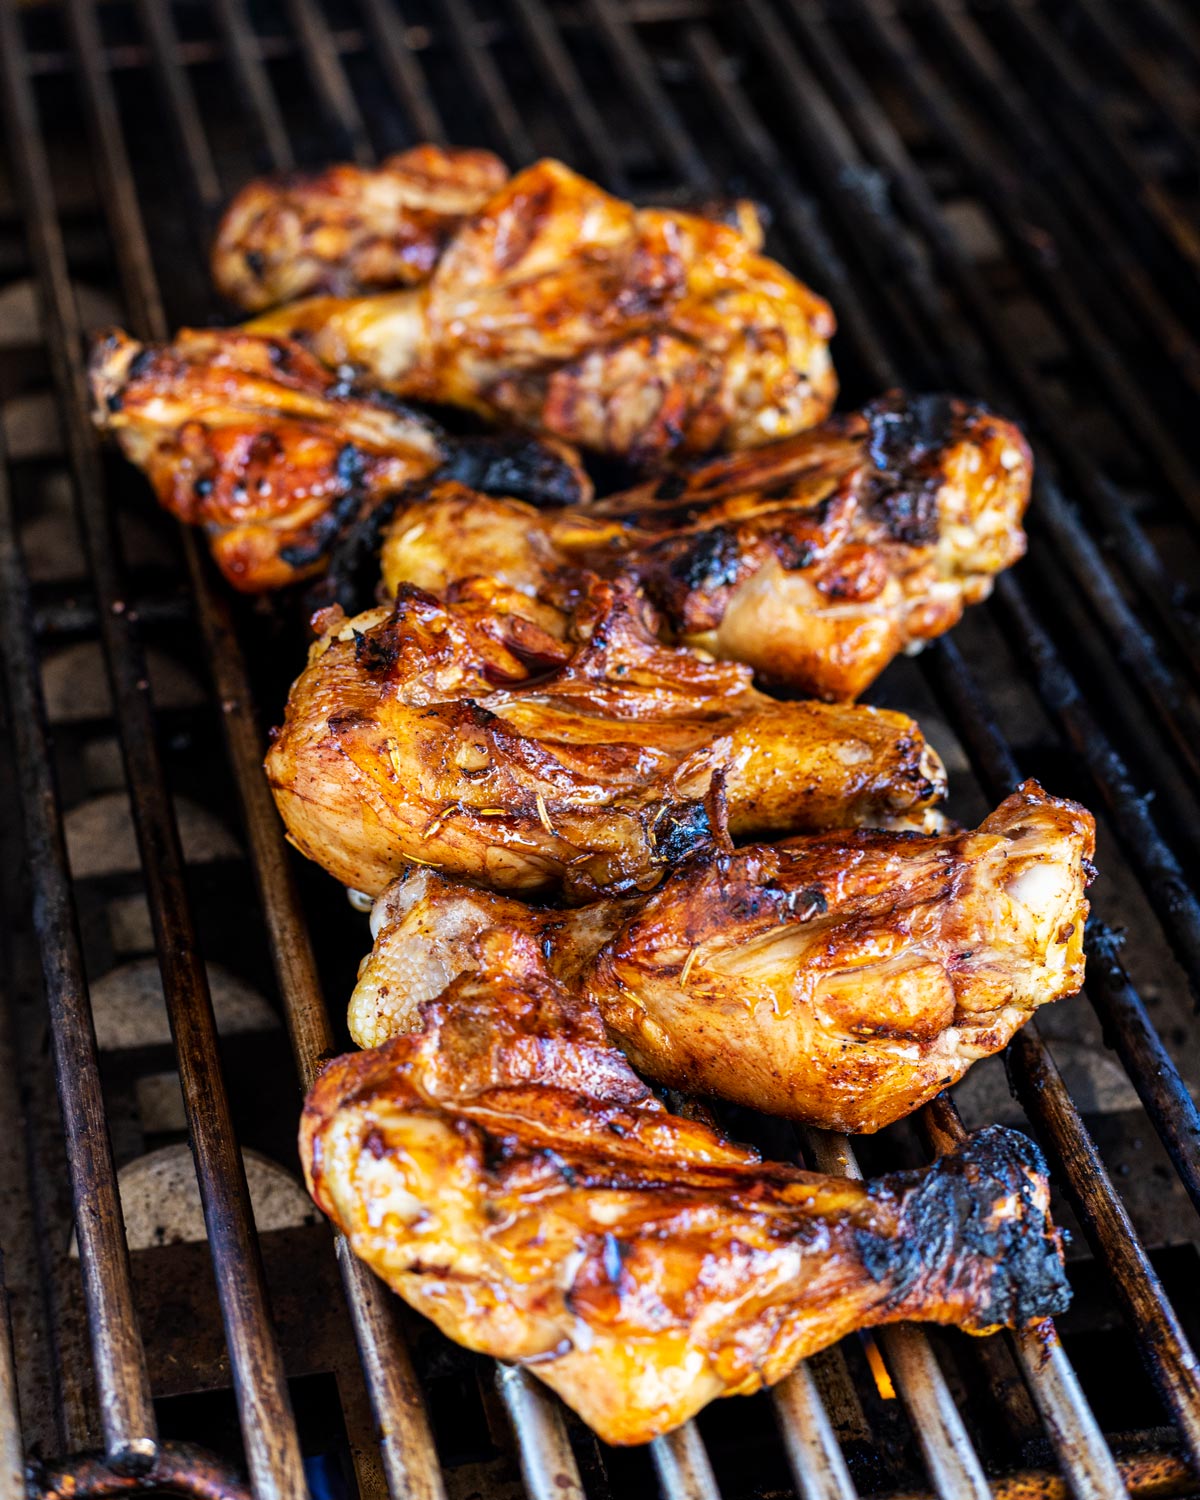
Flip the drumsticks, and repeat the process. You’ll continue to flip and close the lid every few minutes until they are almost cooked. This should take about 20-25 minutes depending on your grill.
Once the chicken temperature is about 155-160°F, go ahead and baste with your BBQ sauce or glaze. Leave the lid off, allowing the heat to blast the outside of the chicken and create caramelization and char.
Flip and repeat, cooking until the chicken is about 180-185°F.
Disadvantages of Butterflied Drumsticks
Quicker cooking time, additional flavor, and crispier chicken… what could be wrong?
Time required for preparation. Slicing open the chicken takes a few minutes, but after you get the hang of it the process speeds up. It’s MUCH faster than making chicken lollipops. Just be prepared for 10 minutes extra for preparation.
Inconsistent appearance. It’s pretty minor, but the other disadvantage I’ve found is the appearance. One side of the chicken has a nice, crispy skin while the other side has charred, sliced chicken. It’s not the most photogenic piece of barbecue, but the benefits greatly outweigh the appearance. One bite into a crispy side of the drumstick and you’ll forget what it looked like.

Tips for Butterflied Chicken Drumsticks
There are many ways to cook these butterflied chicken drumsticks, pretty much all of the same ways that you would cook a regular drumstick. There are a few important tips that I’d like to point out to make sure you have the most success:
- Dry-brine your chicken. This is known as seasoning ahead of time, and placing the meat in the fridge on a wire rack, uncovered. If you’re in the “crispy skin” team like myself, you want as little moisture as possible on the skin. I recommend seasoning all sides and resting in the fridge for at least 2 hours, up to overnight.
- Pat dry and add oil before seasoning. This will make sure the chicken doesn’t stick to the grill (you should be cleaning your grill) but also helps the skin crisp up a bit more. Just a light amount will do the trick.
- Use the lid of your grill. The first half of cooking chicken is all about making sure you can get the temperature higher in the meat while drying out the surface for crispy skin. Closing the lid creates an oven, air rushing around all sides of the meat to achieve this. Don’t walk away though, you’ll need to flip your chicken every 5-7 minutes depending on how hot the grill is.
- Baste with something. BBQ sauce, vinaigrette, garlic butter, just anything. The chicken is a boat, waiting for the flavor passenger to jump aboard so it can sail into your mouth. Seriously though, all of those incredibly crispy crevices are the perfect place to add layers of flavor. Baste at the end right before you focus on crisping up the skin.

More Flavors to Love
The drumsticks are just a vehicle for flavor transportation to your mouth. Don’t limit yourself, try anything! Here are some delicious recipes you can easily transfer to these butterflied chicken drumsticks:
Tried this recipe? Leave a star rating and comment below — it genuinely helps other people find it, and I read every single one.

Grilled Butterflied Chicken Drumsticks
Butterflied chicken drumsticks are an obvious solution to make crispier, more flavorful chicken drumsticks with much less cooking time. Take a few minutes to split open the meat, season, and grill.
- Total Time: 40
- Yield: 6 Chicken Drums 1x
Ingredients
- 6 chicken drumsticks
- BBQ Seasoning, such as Signature Sweet & Smoky Rub
- BBQ Sauce, such as Spicy Buffalo BBQ Sauce
- Vegetable oil, optional
Instructions
- Pat the chicken drumsticks dry. Take a drumstick and place it on your cutting board, with the side up facing you that has the most meat showing. Using a sharp knife, cut the meat along one side of the bone, careful not to slice all the way through. Make a second cut, separating the meat from the other side of the bone. Fold open the meat and lay the drumstick face-down. Repeat for each one.
- Season the drumsticks generously and then place them uncovered in the fridge on a wire rack for 2 hours, up to overnight.
- Preheat grill to medium-high, 400°F for direct cooking. Use a grill with a lid.
- Remove the chicken from the fridge at least 20 minutes before adding to the grill, allowing them to come to room temp.
- Place the drumsticks on the grill grates with the skin-side up. Close the lid and allow them to cook for 5-6 minutes.
- Flip the drumsticks, and repeat the process. You’ll continue to flip and close the lid every few minutes until they are almost cooked. This should take about 20-25 minutes depending on your grill.
- Once the chicken temperature is about 155-160°F, go ahead and baste with your BBQ sauce or glaze. Leave the lid off, allowing the heat to blast the outside of the chicken and create caramelization and char. Flip and repeat, cooking until the chicken is about 180-185°F.
Notes
Chicken drumsticks have more fat than white meat, and can take a bit more punishment with the heat. Feel free to cook to 180-185° without regret. You’ll have crispy, moist chicken that will fall off the bone.
- Prep Time: 10
- Cook Time: 30
- Category: Chicken & Poultry
- Method: Grilling
- Cuisine: Chicken

Brad Prose has been crafting recipes over live fire for 20 years. He’s the author of two cookbooks, Chiles and Smoke and Epic BBQ Sandwiches, and the creator of the original smash burger taco, as credited by the Washington Post, TODAY Show, Good Morning America, and Food Network. Brad is the force behind Chiles and Smoke, the home of Sonoran BBQ: bold flavors built around chiles, smoke, and the traditions of the American Southwest. Follow along on Instagram, YouTube, and Facebook.


I just made this for the first time, following your directions, last night. I used very meaty drumsticks which are easily available to me in my local grocery store. I am thrilled to have this new way of preparing ddrumsticks, as they are such an economical cut and I like drumsticks. I found the prep of the chicken re: cutting them,, easy as I spatchcock whole chickens all the time to roast them in my oven. I used a sauce in the last step of lemon and olive oil with really good dried herbs and it was fantastic, I love it my new fave.
Thank you so much for the feedback Patricia! I’m glad yo read that you not only don’t mind the process, but find that this method works well for pennies on the dollar. Cheers!
Wow !!! Thank you all !!
What temp and how long in the oven?
I haven’t oven-baked these before, I will have to test it and respond back here.
I’ve never seen this until you posted yours and I immediately had to make them!! Amazing recipe and the process of butterflying the chicken legs is genius. I love the charred bits and will only grill my legs this way from now on.
Thanks Kevin! I’ve seen you make them a few times too. Appreciate you sharing 🔥
I rarely ate chicken drumsticks. I was just never a fan of them. but when I saw this method, I had to give it a try. Let me tell you – it’s such a more enjoyable way to eat drumsticks! Easier to eat, more seasoning and sauce, more crispy bites and charr. Just an all around amazing technique, so thank you to Brad for introducing me to this! It’s my go-to for a quick and delicious cooking method on week nights and for company from here on out.
Appreciate your detailed feedback! It’s great to hear the results from so many
Butterflies drummies are a weekly staple now, I love getting that extra char off the charcoal grill!
Thanks for the feedback!
This is a great recipe and technique. I tried it and was so happy with how juicy the chicken stayed. I’ll definitely do this again. Thank you for sharing!
Brad is a gentleman and a scholar. The Albert Einstein of food. This recipe really shows his ability to create and overcome his crippling handicap of not being v good looking.
I’ve got a face for radio
Such a simple idea that works so well. Flavor is why we grill in the first place. This is a great way to add even more flavor. I tried this and absolutely love this method.
Thanks Will! So glad you enjoy it
I’ll admit, I’m not usually big on drum sticks.. but these were a game changer. I ended up with a nice crisp outside, with tender and juicy meat. The whole family (even the picky 4 year old) LOVED when I cooked them this way. They were easier for the kids to eat as well. Definitely recommend giving this method a try, it’s worth it!
I loved everything about this. It takes something we all probably have stocked in our freezer and gave it a fun new twist that amplifies all of the best things about chicken. The way it takes on flavors increases ten fold whether you’re simply seasoning it or marinating it. It makes an already quick cooking weeknight staple cook that much faster. And what is better than that crispy bite kissed by char? These butterflied drums are begging for a date with fire. It’s also something anyone can do, no fancy tools and mad knife skills required.
Appreciate the feedback, so glad to know you enjoy them as much as we do!
I love Brad & following him for new new recipes. But this was no recipe. This was some new crazy wild technique that made me look sideways and go what?!!! Okay I see what you’re doing, but do I really want to add more prep time to chicken legs of all things? Hahahaha
Turns out, yes! Yes I do! Pulled out my favorite boning knives and made my first cuts and went to cutting, & lickety split within a few I was done with the first one. I thought to myself. It can’t be that easy. So I grabbed another, looking up at the clock then glancing down at the large tray of legs.
Took a deep breath & went for it. I don’t rightly remember how much time passed but it was quick! I seasoned them up and filled my entire upper rack in my Yoder 640. They were very well received by my mister who ordinarily isn’t the biggest leg fan.
He gave 2 thumbs up. We have a real winner here.
Thanks for resurrecting the chicken leg in this house. Bawk
Lisa, thanks for the laughs and honest review. I’m glad you finally gave in
When I first saw Brad’s post on IG showing his butterflied drumstick technique I knew immediately I needed to try it! Our family loves drumsticks but they can take too long to cook right and with the traditional way of cooking the flavor is just on the outside. Adding the butterflied option it solves both of those problems. It allows them to cook quicker and you get more flavor because you are increasing the overall surface area. I’ve tried these in the oven in a cast iron skillet which works extremely well in addition to cooking on the smoker. Definitely recommend this technique and recipe. You will not be disappointed!
Thanks for the insight Chad. I’ll have to give it a go in cast iron, I bet that will give it a nice crispy crust.
This is a sure-fire winner and will make you look like a genius at your next cookout! Brad described it perfectly but think about it….faster cook times, more even cooking throughout, and way better meat to seasoning ratio. An instant classic with so many possibilities!
Love this recipe! It’s my new favorite way of grilling chicken drumsticks. Kids love it too!
Huge compliment! Thank you fellow grill-dad!
My new go to method for drumsticks! A quick and easy butterfly of the drum and now it eats like a thigh with a handle. Love how it makes so much more surface area for all of the seasoning, sauce, and carmelization!
Super fun way to do legs- love bringing back and old technique and turning it into something delish ! Love doing it myself with some white alabama sauce
That sauce is SO good, I’ll have to try that with these drums
What an amazing and super easy recipe! Loved taking something not too loved and turning into something new and exciting! Great job on this one brad! Its a home run at our house now!
Thanks Mel! Yeah we never bought drums on the regular until recently. Especially with how expensive wings are
When I saw you doing this, I was like what is he doing? But then I had to give it a try and I will never look at chicken legs the same way again! Creates a lot more surface and which means more crispy edges! Awesome technique Brad! Keep ‘em coming dude! 👊🏻🤙🏻
Call me crazy, it’s ok. 🤣😅 Thanks Tim!!
Awesome new way to eat an American Favorite. This is a game changer with Chicken Legs and the flavor combinations are endless. There’s nothing better than a crispy crunchy bite every time!
Thanks for sharing Nate! I’m totally hooked too
Amazing process! Speeds up the cook on drumsticks and allows for much better rub and glaze coverage. Highly recommend
Thanks! Loved your spin on them. Appreciate you sharing and support
Hands down one of the best ways I’ve made drumsticks! Crispy, juicy, and so much more intriguing when they make it to the table for the family! It’s on repeat now Brad! Thank you
Glad to hear it Cory! Appreciate you sharing
This is an awesome twist on traditional drums! We loved how they crisped up and had more area for our rub! They also cook through easier! My kids loved them!
Little effort goes a long way! If the kids love it, you know it’s a win.
This is a brilliant idea! We followed Brad’s method and the chicken came out incredible. It’s a bit of knife work but really not that bad. The drumsticks open up easily. Kids said it was like eating chicken wings but less messy!
Thank you! So glad that your family enjoyed it.
Absolutely game changing cooking technique. When I stumbled across Brad’s post it just clicked all the boxes- budget, texture and flavour enhancement.
With the price of chicken wings this is such a brilliant alternative cooking opportunity. Takes mere minutes to prep and never leaves leftovers!
Thanks Steph! I loved seeing your take on it, keep up the passion with your cooking.