
Smoked Beef Ribs (Texas Dino Ribs)

Last tested on: 5/02/2026
Smoked beef plate ribs, also called dino ribs or brisket on a stick, are a full rack of 3 large bones smoked at 275°F for 7-8 hours, wrapped in butcher paper at 165°F, then rested for at least an hour before slicing. The key difference from brisket: a hotter temp, less trimming, and a rest that matters just as much as the cook.
I’ve made this more times than I can count, and the moment I pull a rack off the smoker and that bark-covered slab hits the paper still gets me every time. Rich, fatty, impossibly tender. This is the cook I recommend to anyone who thinks they’ve already mastered brisket. These are harder to find and worth every minute.
Not looking for plate ribs? If you picked up the smaller, flatter rack from the grocery store, you likely have Smoked Beef Back Ribs, a great recipe but a completely different cut with a different process. See that guide for the right technique.

Why This Method Works
- 275°F runs hotter than brisket for a reason. The bones and thick membrane on the underside insulate the meat, so you need more heat to drive through. Running at 225°F on these will take 10+ hours and the fat won’t render properly. At 275°F, the fat melts into the meat and the bark sets hard.
- Wrapping at 165°F powers through the stall. Like brisket, plate ribs hit a temperature plateau around 160-170°F where evaporation stalls the cook. Butcher paper traps enough heat to push through without steaming the bark soft the way foil does.
- The rest is non-negotiable. Just like brisket, these ribs need at least 1 hour, and ideally 2, to let the internal juices redistribute after the cook. Slice too soon and you’ll lose everything you worked for to the cutting board.
- The bone protects the meat. Unlike a brisket flat that can dry out if you push past temperature, the bone on plate ribs acts as a buffer. This gives you a larger window at the end of the cook, a forgiving quality that makes this one of the most reliable big cooks in BBQ.
Beef Plate Ribs vs. Beef Back Ribs: Know What You’re Buying
This is the most common point of confusion with beef ribs, and getting it wrong means starting over.
Beef plate ribs (what this recipe is for) come from the lower section of the rib cage, close to the belly. They come as a plate of 3 massive bones with a thick slab of meat on top. Each individual rib can weigh over a pound after cooking. You typically won’t find them in a standard grocery store display case. Ask the butcher counter for “untrimmed short ribs” or “123A short ribs.” Your best bet is a local butcher or online retailer.
Beef back ribs come from the upper rib cage, right where ribeye steaks are cut. Because butchers remove as much meat as possible when breaking down that primal, back ribs are left with most of their meat between the bones rather than on top. They’re smaller, less meaty, and require a completely different approach.
The visual test: if you can see bone poking through the top, those are back ribs. If the meat is stacked thick on top of the bones with barely any bone visible, those are plate ribs.

Beef Plate Ribs Beef Back Ribs


Key Ingredients
- Beef plate ribs (4-5 lbs, 3-bone rack): Buy the whole rack uncut. Individual ribs tend to tip over on the smoker and cook unevenly. One rack feeds 4-5 people easily given the richness.
- Seasoning: A classic 50/50 blend of coarse kosher salt and 16-mesh black pepper is the Texas standard, or use Canyon Crust Beef Seasoning for a coarse salt and pepper base with smoky chiles, granulated garlic, and celery seeds built specifically for beef.
- Spritz liquid (apple cider vinegar, beef broth, or black coffee): Start spritzing after the first hour. Acid breaks down surface collagen and keeps the sides moist. Black coffee builds a darker bark; apple cider vinegar adds a subtle tang.
- Pink butcher paper: For the optional wrap. Butcher paper is porous; it lets steam escape, which keeps the bark from going soft the way aluminum foil would. Have a generous length ready before the cook.
How to Smoke Beef Plate Ribs: Step-by-Step
Step 1: Trim and Season
Trim the thin layer of fat, silverskin, or connective tissue from the top (meat side) of the rack, just enough to expose the meat surface without going deep. Leave the thick membrane on the bone side completely intact. Unlike pork ribs, the membrane here helps hold the bones in place and there’s very little meat underneath it.
Season heavily on all sides. If you’re using a coarse salt and pepper blend or Canyon Crust, you want a visible coating. Allow the ribs to rest at room temperature for at least 30 minutes before they go on the smoker, giving the surface time to sweat and the rub to embed. For maximum bark development, season the night before and leave the rack uncovered on a wire rack in the fridge. This dry-brining step makes a real difference in bark texture.

Step 2: Set Up the Smoker and Get the Ribs On
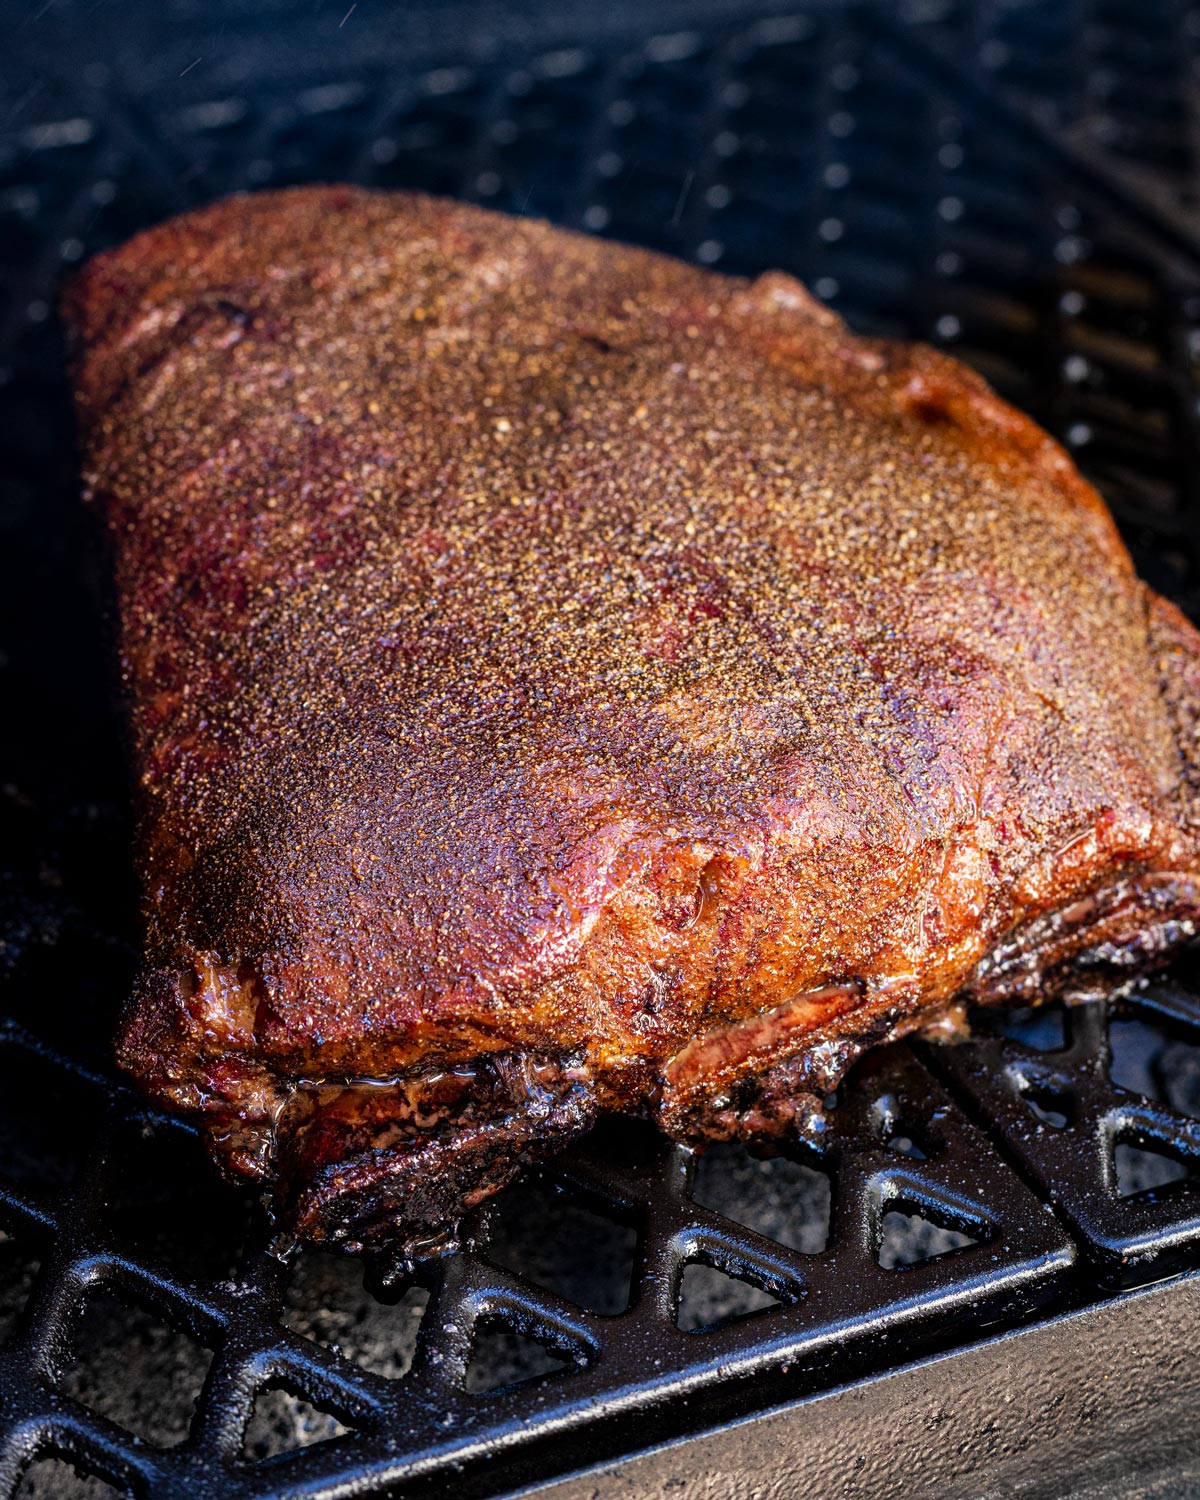
Preheat your smoker to 275°F. For wood, post oak is the Texas standard for beef and my first choice. It burns clean and adds a bold, earthy smoke without turning bitter. Pecan is a great alternative, slightly sweeter and more approachable. Avoid fruit woods like apple or cherry for plate ribs; they’re too light for this much beef.
Place the rack bone-side down on the grates. The bone acts as a heat shield, protecting the meat from the direct radiant heat underneath. Let them smoke undisturbed for the first hour. This gives the bark foundation time to set. Resist the urge to spritz early.
Step 3: Spritz and Monitor the Bark
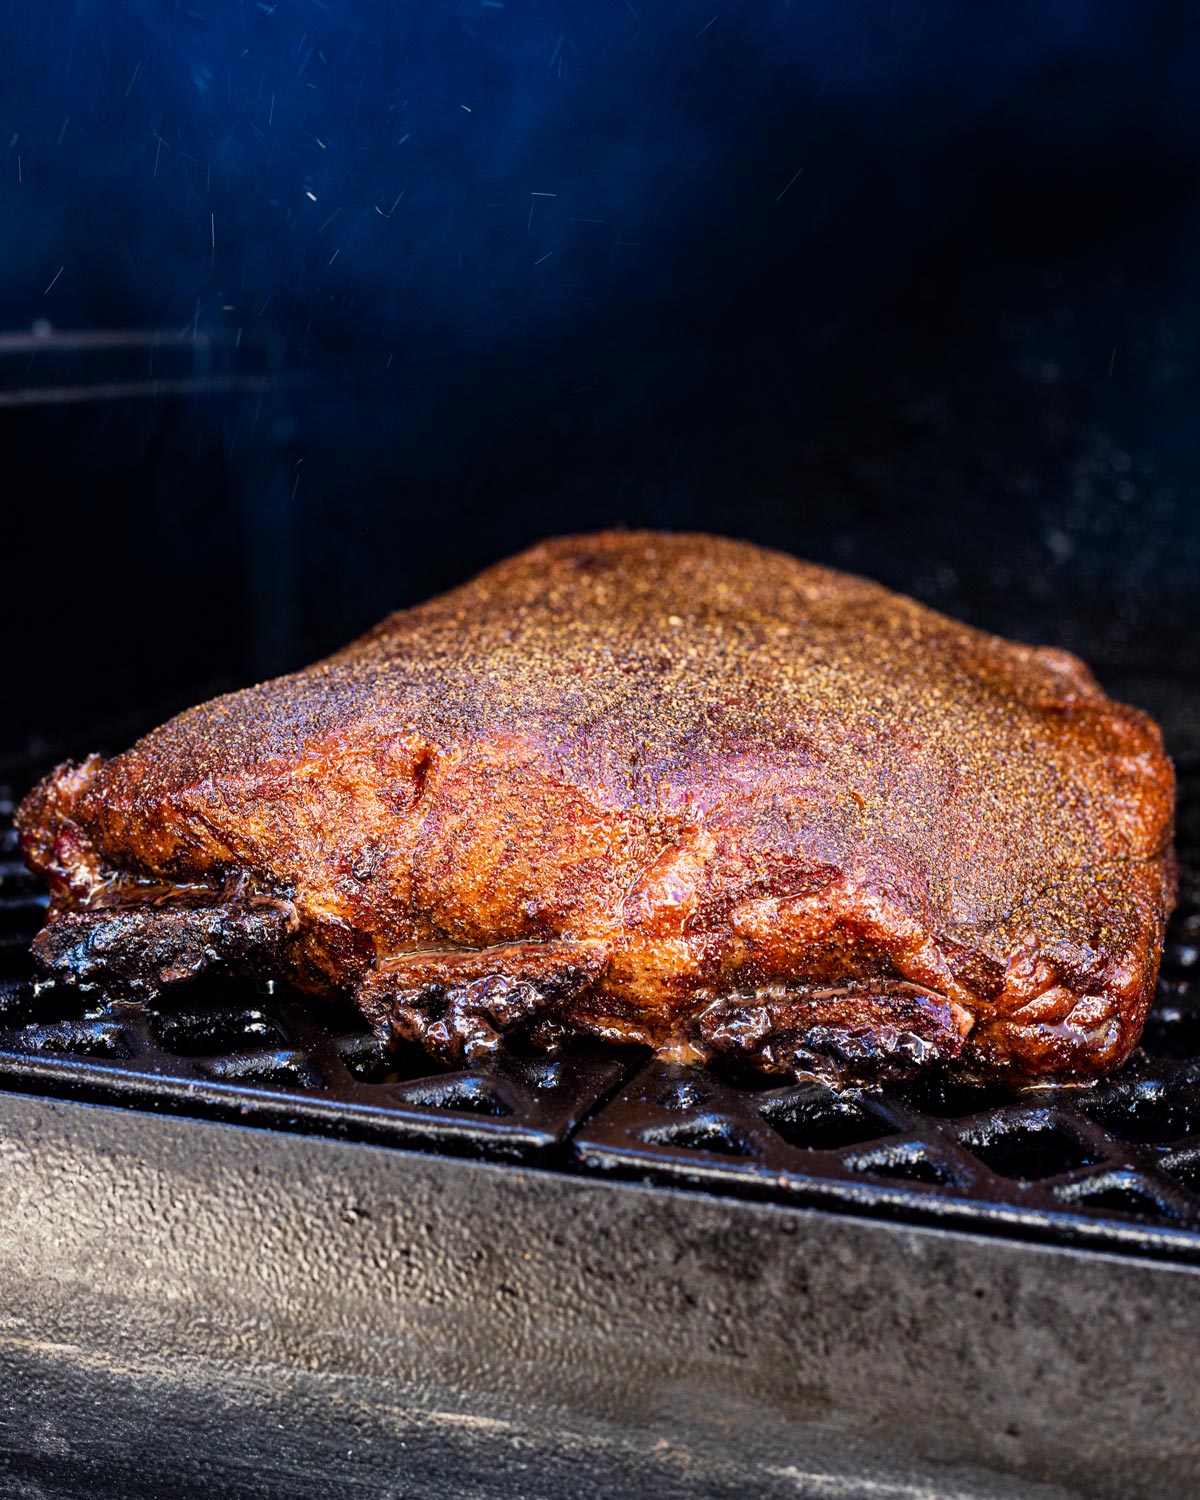
After the first hour, begin spritzing every 45-60 minutes, focusing on the sides and any exposed edges that look like they’re drying out. The top will take care of itself; it’s the sides and ends that need attention. Use apple cider vinegar, beef broth, or black coffee. A plastic spray bottle works well; a mop brush gives you more control and more coverage.
Watch the bark develop: you’re looking for a deep mahogany color, a firm surface, and a slight pull-back of the meat from the bone ends. This usually happens somewhere between 3-5 hours in, depending on your smoker.
Step 4: Wrap (Optional but Recommended)
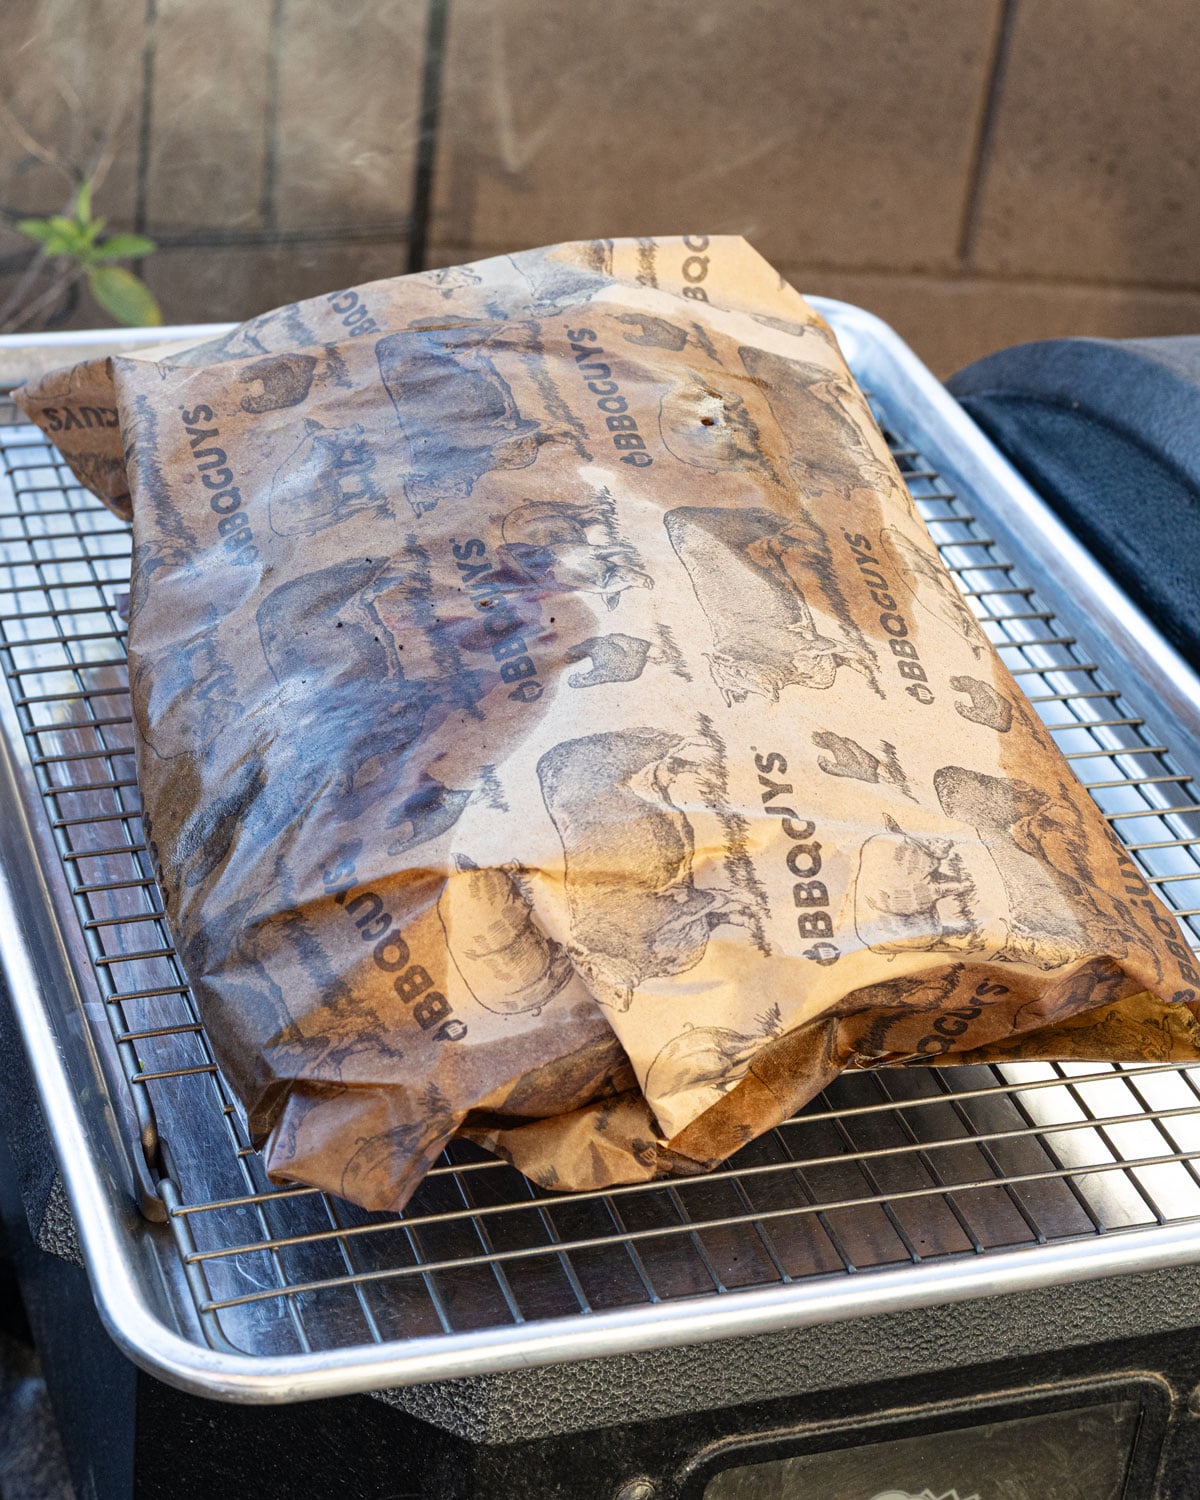
Once the bark is set and the internal temperature of the thickest part of the meat reads 165-170°F, you have a decision to make.
Wrap for a juicier, faster finish: Spritz the ribs one final time, then wrap tightly in a double layer of pink butcher paper, folding the seams under so nothing can escape. Place them back on the smoker bone-side down and run the temperature up to 275-300°F. The butcher paper captures enough heat to push through the stall without softening the bark the way foil does.
Skip the wrap for maximum bark: If you want a harder, crispier crust, or you’re planning an extended rest of 2+ hours, leave them unwrapped and keep spritzing every 45 minutes. Budget an extra 1-2 hours on total cook time. The no-wrap method produces a slightly drier exterior that holds up beautifully during a long rest in a cooler.
Step 5: Check for Doneness
Temperature is a guide, not the finish line. Your target is 200-205°F internal in the thickest part of the meat, but use the probe to tell you when they’re actually done.
Insert your temperature probe into the thickest section of the meat and feel the resistance. When the ribs are ready, the probe should slide in with almost no pushback, like pushing into a jar of warm peanut butter. If you feel any resistance at all, give them more time, regardless of what the thermometer says. Check every 15-20 minutes once you’re in the 195°F range.

Step 6: Rest (Do Not Skip This)
Resting is the step most people rush, and it’s where a lot of great cooks go sideways at the end.
Pull the ribs from the smoker when they’re probe-tender and wrap them in a fresh layer of butcher paper if they aren’t already. Let them rest at room temperature for a minimum of 30-45 minutes. For the best result, rest them for 1-2 hours.
For an extended rest, which is a great strategy when you’re timing a meal, place the wrapped ribs in a dry cooler (no ice) lined with a towel. They’ll hold at serving temperature for 2-4 hours this way, and they often come out even better for it. Just verify the internal temperature stays above 140°F if you’re holding them longer than 2 hours.
The resting period allows the internal juices and rendered fat to redistribute through the meat. Slice too early and you’ll see all of that liquid run out onto the cutting board. Give it time.
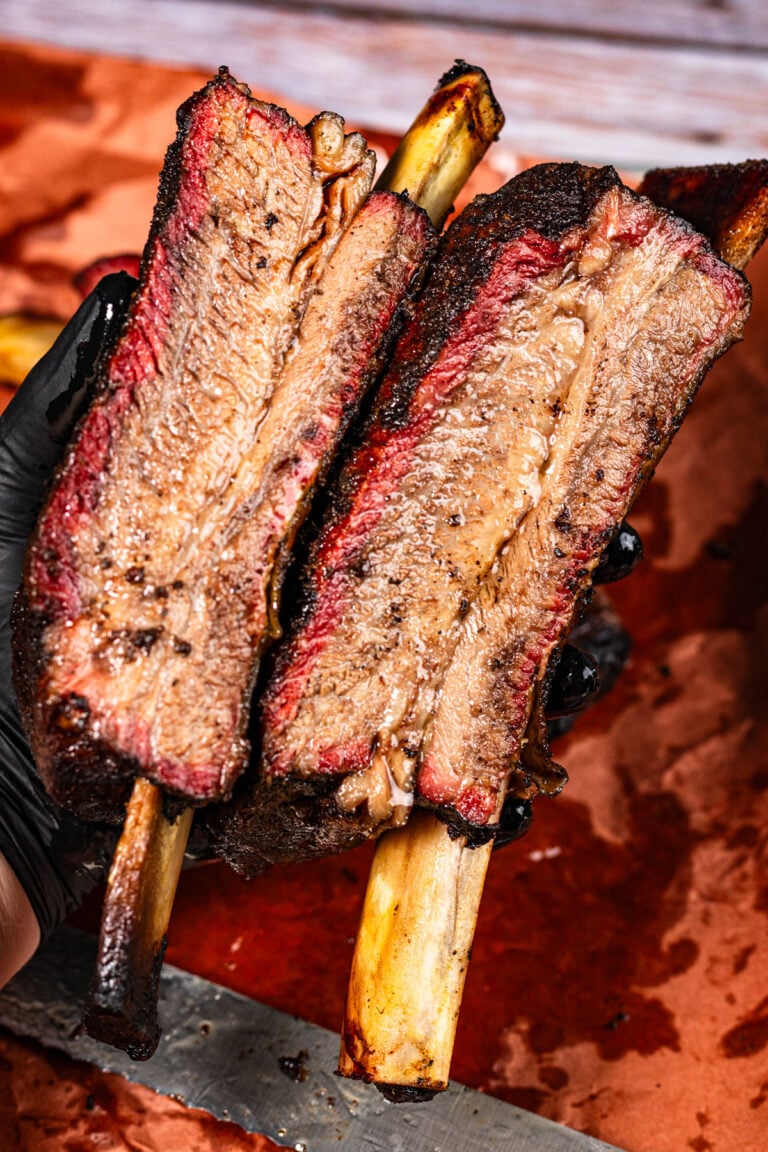
Step 7: Slice and Serve
Remove the butcher paper and cut between the bones to serve individual ribs. Each bone is its own portion. These are rich enough that one rib feeds most people easily; two is a serious feast.

Pro Tips from the Pit
- The peanut butter test beats the thermometer every time. Internal temperature gives you a range; the probe feel gives you precision. If there’s any resistance, keep cooking. On a thick rack, the difference between “almost done” and “done” can be 30-45 minutes past 200°F.
- Running at 225°F is a mistake with this cut. I hear this often from people applying their pork rib logic to plate ribs. The bone and membrane insulate this cut so well that low-and-slow produces tough, under-rendered fat. 275°F is the move.
- Don’t skip the overnight dry-brine if you have time. Season the night before, leave the rack uncovered on a wire rack in the fridge, and you’ll get noticeably better bark development the next day. The surface draws moisture out, which then reabsorbs along with the salt. Deeper flavor, harder crust.
- Post oak for smoke, and don’t overdo it. Plate ribs are already deeply flavored. You don’t need heavy smoke to compete with the beef. One or two chunks of post oak or pecan at the start is enough. Too much smoke on a long cook turns bitter.
- One rack feeds more than you think. Because of the richness and fat content, most adults are satisfied with one rib. Plan for 1-1.5 ribs per person. A 3-bone rack comfortably feeds 4-5 people.
- Leftovers are exceptional. Slice cold the next day and reheat wrapped in butcher paper in a 275°F oven with a small pour of beef broth. Or slice thin and pile onto a toasted bun with a swipe of red chimichurri sauce.
What to Serve With Smoked Beef Plate Ribs
The ribs take all day. Use that time to build a spread that matches the occasion.
- Smoked Mac and Cheese: Goes on the smoker alongside the ribs and absorbs the same smoke. The most natural pairing in BBQ.
- Southwest Creamed Corn: Sweet, creamy, and just rich enough to stand up to the beef without competing.
- Smoked Baked Potatoes: Another smoker companion. Load them up with butter, sour cream, and bacon, and you have a full table.
- Creamy Southwestern Coleslaw: The acid and crunch cut through the richness of the plate ribs in a way that a heavier side can’t.
- Southern Macaroni Salad: Make it the day before. It gets better overnight, and there’s nothing to babysit on cook day.

Frequently Asked Questions
Plan on 7-9 hours total at 275°F, plus 1-2 hours of resting time. If you wrap in butcher paper at 165°F, you’ll be closer to the 7-8 hour mark. If you skip the wrap, budget 8-9 hours or more. Cook time varies by rack size; a 4-pound rack cooks faster than a 6-pound one. Always go by feel (probe tenderness), not the clock.
Beef plate ribs come from the lower rib cage near the belly, with thick meat stacked on top of 3 large bones. They’re sometimes called dino ribs or brisket on a stick. Beef back ribs come from the upper rib cage near the spine; they’re smaller, with most of their meat between the bones rather than on top. They require a different recipe entirely. See our Smoked Beef Back Ribs guide for that cut.
Smoke beef plate ribs at 275°F. Unlike pork ribs or brisket, which are often run at 225-250°F, plate ribs benefit from the higher heat. The bone and membrane insulate the meat so well that a lower temperature produces tougher, under-rendered fat. Once wrapped in butcher paper, you can push to 275-300°F to speed things up.
Wrapping is optional. Wrapping in pink butcher paper at 165°F speeds up the cook, helps push through the temperature stall, and keeps the meat moist. Skipping the wrap gives you a harder, crispier bark and works especially well if you plan to rest the ribs in a cooler for 2+ hours. Both methods produce excellent results; it comes down to timing and bark preference.
Post oak is the Texas standard and the top choice for plate ribs. It burns clean and adds a bold, earthy smoke that complements beef without turning bitter. Pecan is a close second, slightly sweeter and more mellow. Hickory works too but can be aggressive on a long cook. Avoid light fruit woods like apple or cherry; they don’t have enough body to stand up to this much beef.
One 3-bone rack (typically 4-6 lbs raw) feeds 4-5 people. Plate ribs are extremely rich and fatty. Most adults are fully satisfied with one rib. Two ribs per person is a serious feast. If you’re feeding a larger group or want generous portions, plan for 2 racks and cook them side by side.
Equipment
- Smoker (offset, pellet, or kamado): All three work well for this cook. The key is stable temperature at 275°F, not the specific style of smoker.
- Pink butcher paper: For the optional wrap and for resting. Keep a generous sheet ready before the cook starts.
- Instant-read thermometer (Thermapen recommended): For checking probe tenderness and final temp.
- Leave-in temperature probe: Optional but helpful for monitoring without opening the smoker and losing heat.
- Spray bottle: For spritzing after the first hour.
- Wire rack and baking sheet: For the overnight dry-brine if you go that route.
Try It and Tag Us
Make a jar this week and keep it in the fridge. You’ll find a reason to put them on something every day. Tag us on Instagram when you do. Leave a rating below if this helped.
Smoked Beef Ribs (Texas Dino Ribs)
Beef plate ribs, also called dino ribs or brisket on a stick, smoked low and slow at 275°F until probe-tender with a deep black bark and a smoke ring in every slice. This is the king of backyard BBQ.
- Total Time: 9-10 hours
- Yield: 4-5 1x
Ingredients
- 1 section of beef plate ribs (about 4–5 pounds)
- 4–5 tablespoons coarse kosher salt and black pepper (50/50 blend), or Canyon Crust Beef Seasoning
- 1 cup beef broth, apple cider vinegar, or black coffee for spritzing
- Pink butcher paper for wrapping (optional)
Instructions
- Trim the thin layer of silverskin or fat from the top (meat side) of the beef ribs to expose the meat. Leave the membrane on the bone side intact. Season all sides generously and allow the ribs to rest at room temperature for at least 30 minutes before cooking.
- Preheat the smoker to 275°F.
- Place the beef ribs bone-side down in the smoker. Let them smoke undisturbed for the first hour, then begin spritzing every 45-60 minutes, focusing on the sides and edges.
- (Wrapping) Once the bark is set and the internal temperature reaches 165-170°F, spritz one final time and wrap tightly in butcher paper. Place back on the smoker bone-side down and increase the temperature to 300°F if desired.
- (Not Wrapping) Continue smoking and spritzing every 45 minutes until probe tender. Budget an extra 1-2 hours compared to the wrapped method.
- Once the internal temperature reaches around 200°F, begin checking for doneness with a temperature probe. The probe should slide into the thickest part of the meat with almost no resistance, like pushing into a jar of warm peanut butter.
- Remove from the smoker and wrap in a fresh layer of butcher paper if not already wrapped. Rest for a minimum of 1 hour at room temperature, or place in a dry cooler (no ice) for up to 4 hours. Do not skip the rest. Slice between the bones and serve.
Notes
- No-wrap option: Skip the butcher paper entirely for a harder, crispier bark. Plan on 8-9 hours total and spritz every 45-60 minutes after the first hour. This method pairs especially well with an extended rest in a cooler.
- Resting: These ribs rest just like a brisket and the longer the better. A minimum of 1 hour at room temperature is required. For the best result, place the wrapped ribs in a dry cooler (no ice) lined with a towel and hold for 2-4 hours. They will often come out even better for it. Verify the internal temperature stays above 140°F if holding longer than 2 hours.
- Storage: Refrigerate leftovers wrapped tightly for up to 4 days. Reheat in a 275°F oven wrapped in butcher paper with a small splash of beef broth for 30-45 minutes. Avoid the microwave.
- Not plate ribs? If your rack is smaller with bones visible through the top of the meat, you likely have beef back ribs. See our Smoked Beef Back Ribs recipe for that cut.
- Prep Time: 15 minutes
- Rest Time: 1-2 hours
- Cook Time: 7-8 hours
- Category: Beef & Lamb
- Method: smoking
- Cuisine: American BBQ, BBQ, Texas BBQ
- Diet: Dairy-Free, Gluten-Free
Nutrition
- Serving Size:
- Calories: 886
- Sugar: 0 g
- Sodium: 1595.6 mg
- Fat: 54.4 g
- Carbohydrates: 1.5 g
- Protein: 91.6 g
- Cholesterol: 343.8 mg
Brad Prose has been crafting recipes over live fire for 20 years. He’s the author of two cookbooks, Chiles and Smoke and Epic BBQ Sandwiches, and the creator of the original smash burger taco, as credited by the Washington Post, TODAY Show, Good Morning America, and Food Network. Brad is the force behind Chiles and Smoke, the home of Sonoran BBQ: bold flavors built around chiles, smoke, and the traditions of the American Southwest. Follow along on Instagram, YouTube, and Facebook.


Super helpful guide. I definitely bought the wrong ribs last time, I was so confused.
So do I smoke them at 265 or 275 as you’ve written both?
Good catch! Adjusted the article, which should be around 275. It doesn’t need to be exact! Thank you